
Day 1
The Arrival
Welcome to Rusty Lake! After getting out of the carriage, your main goal is to get inside the house. To achieve this, you’ll need to feed the horse and pay the coachman. Dig up and collect a carrot from the planter below the left window. Now open the window and collect a tin cup. The second tin cup can be found inside the carriage.
Open the right window and place the tin cups next to the other ones.
To solve the cup puzzle, arrange the cups by the number of lines, starting with one and ending with five.
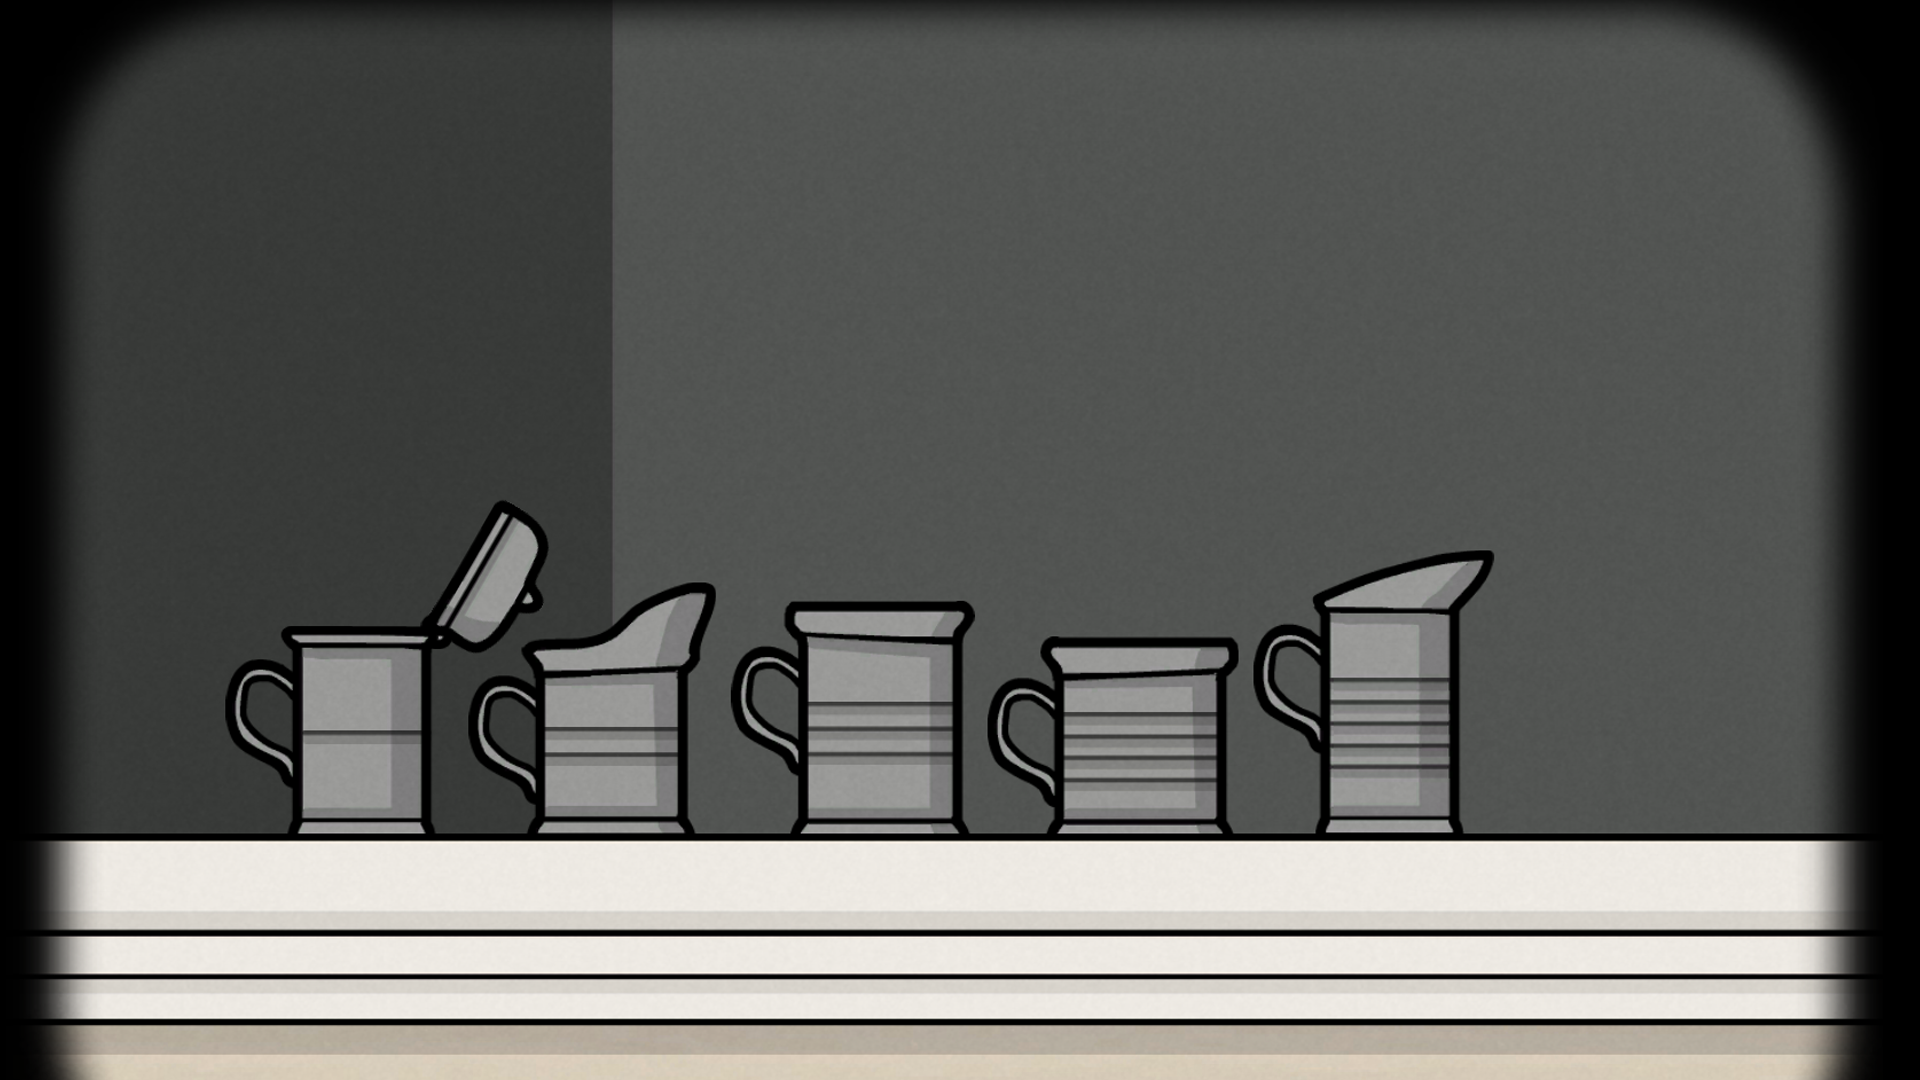
Collect the coin from the tin cup, then feed the horse with the carrot and pay the coachman with the coin.
Collect the iron bar that fell from the carriage and use it on the loose floorboard in front of the planter.
Collect the key and use it to open the door and go inside.
Talk to the maid until she gives you a feather, sign the contract on the table using the feather, and talk to the maid again to finish the level.
Preparing Breakfast
Your first task as a servant is preparing breakfast for the master of the house: Mr. Aldous.
Start by collecting wood and oats in the Servant’s Room, then grab the milk from the crate behind the maid, and finally collect the pan and dead mouse from the cupboard next to Aldous’ Bedroom door.
Feed the mouse to the cat and collect the matches.
Now add the wood to the stove in the Servant’s Room and light it using the matches. Put the pan on the stove, add milk and oats. Wait for it to boil and collect the small pot with porridge.
Go into Aldous’ Bedroom to finish the level.
Waking Up Aldous
Before you can feed Aldous, you’ll need to wake him up. Firstly open up the curtain on Aldous’ bed, then grab the clock hand from the tin soldier on the cupboard and place it on the alarm clock. Set the alarm clock to 7 AM to wake Aldous up.
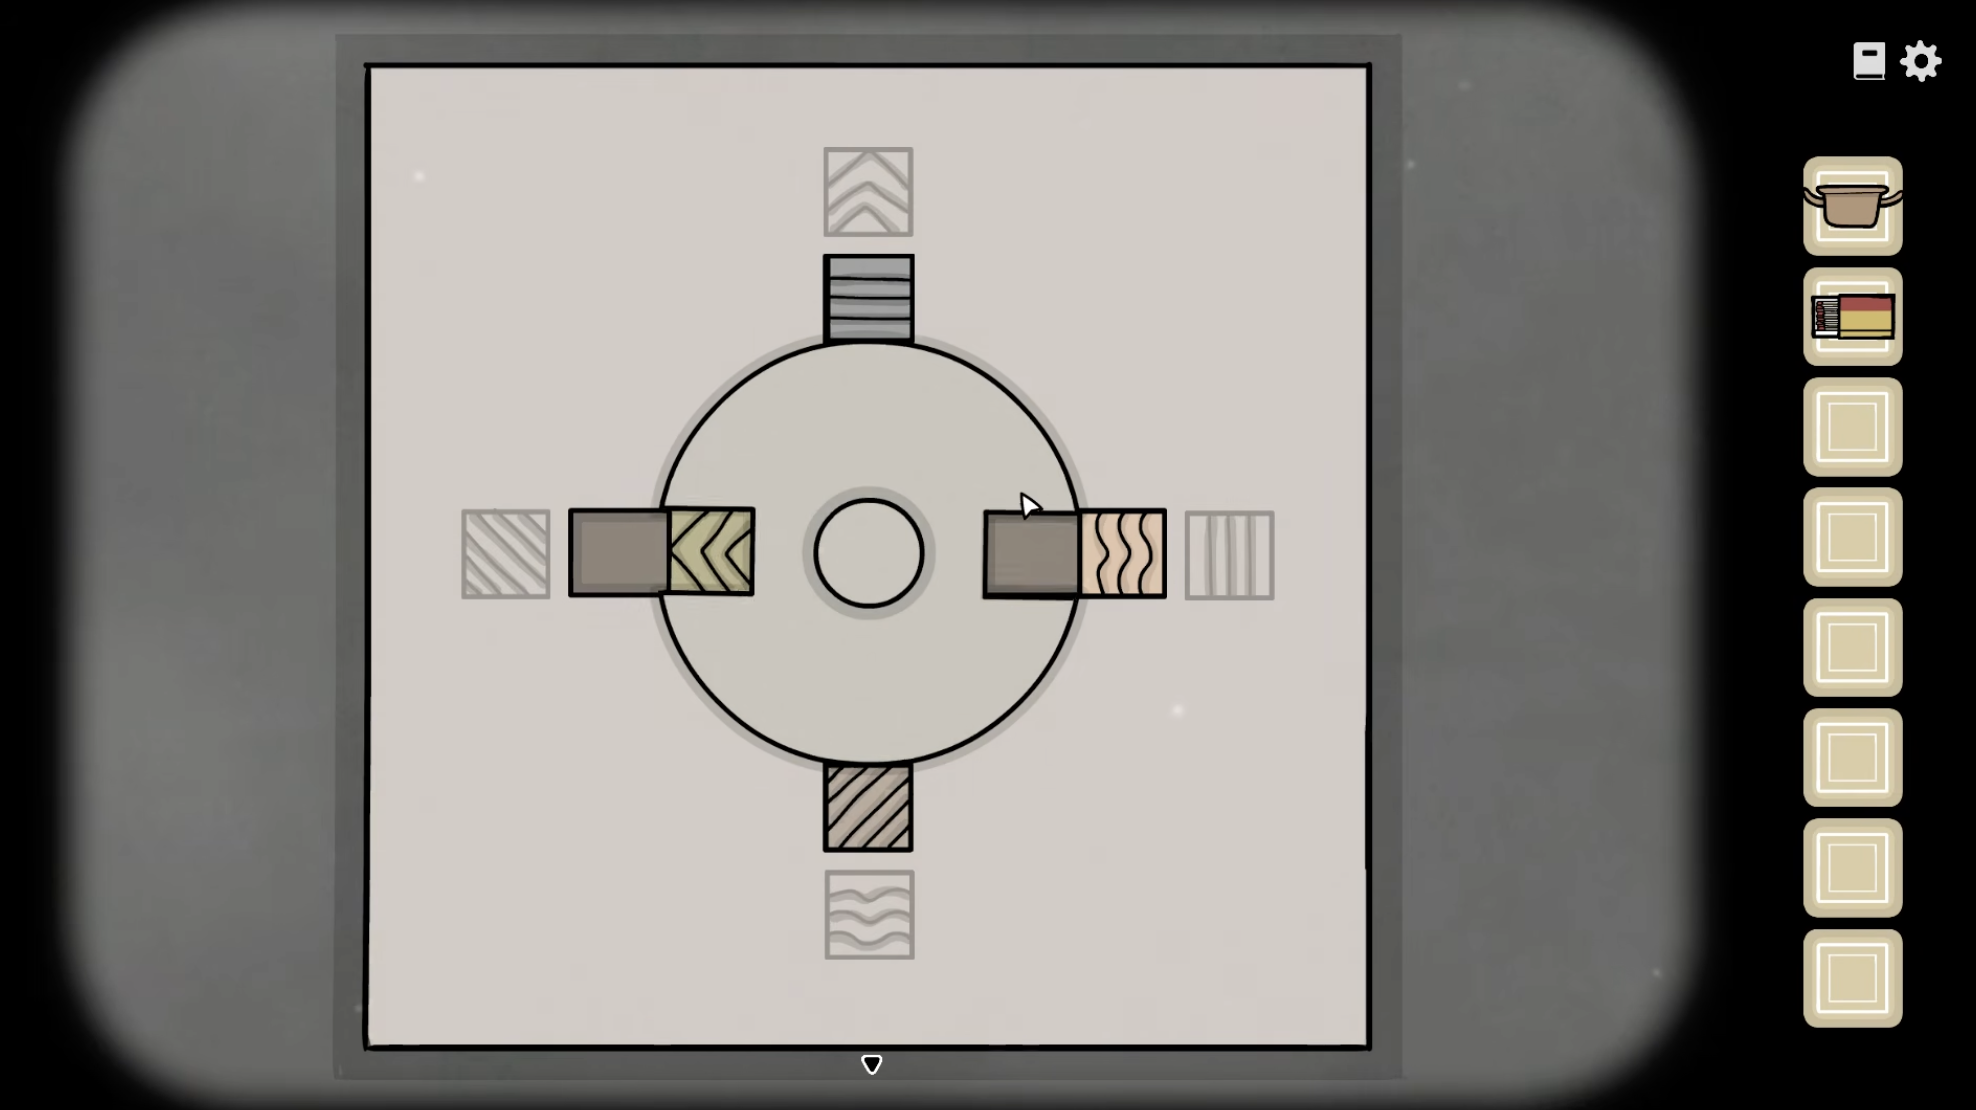
The ever-demanding Aldous will ask for a shave next; unlock the box on the floor by matching the patterns on the blocks to the patterns on the box. Use the rotating wheel to move the blocks.
Collect the razor after opening the box and shave Aldous. After messing up, collect the earlobe.
Find the cloth hidden on the clothes rack and clean Aldous’ ear. Now feed the earlobe to the crow outside so you can collect the key.
Open all the drawers in the cupboard, using the key to unlock the top drawer; collect the berries, spoon, and slipper.
Grab the bowl from the table and hand it to Aldous. Add the berries, spoon, and porridge to the bowl.
Now solve the berry puzzle by plugging all the holes the insect crawls out of.
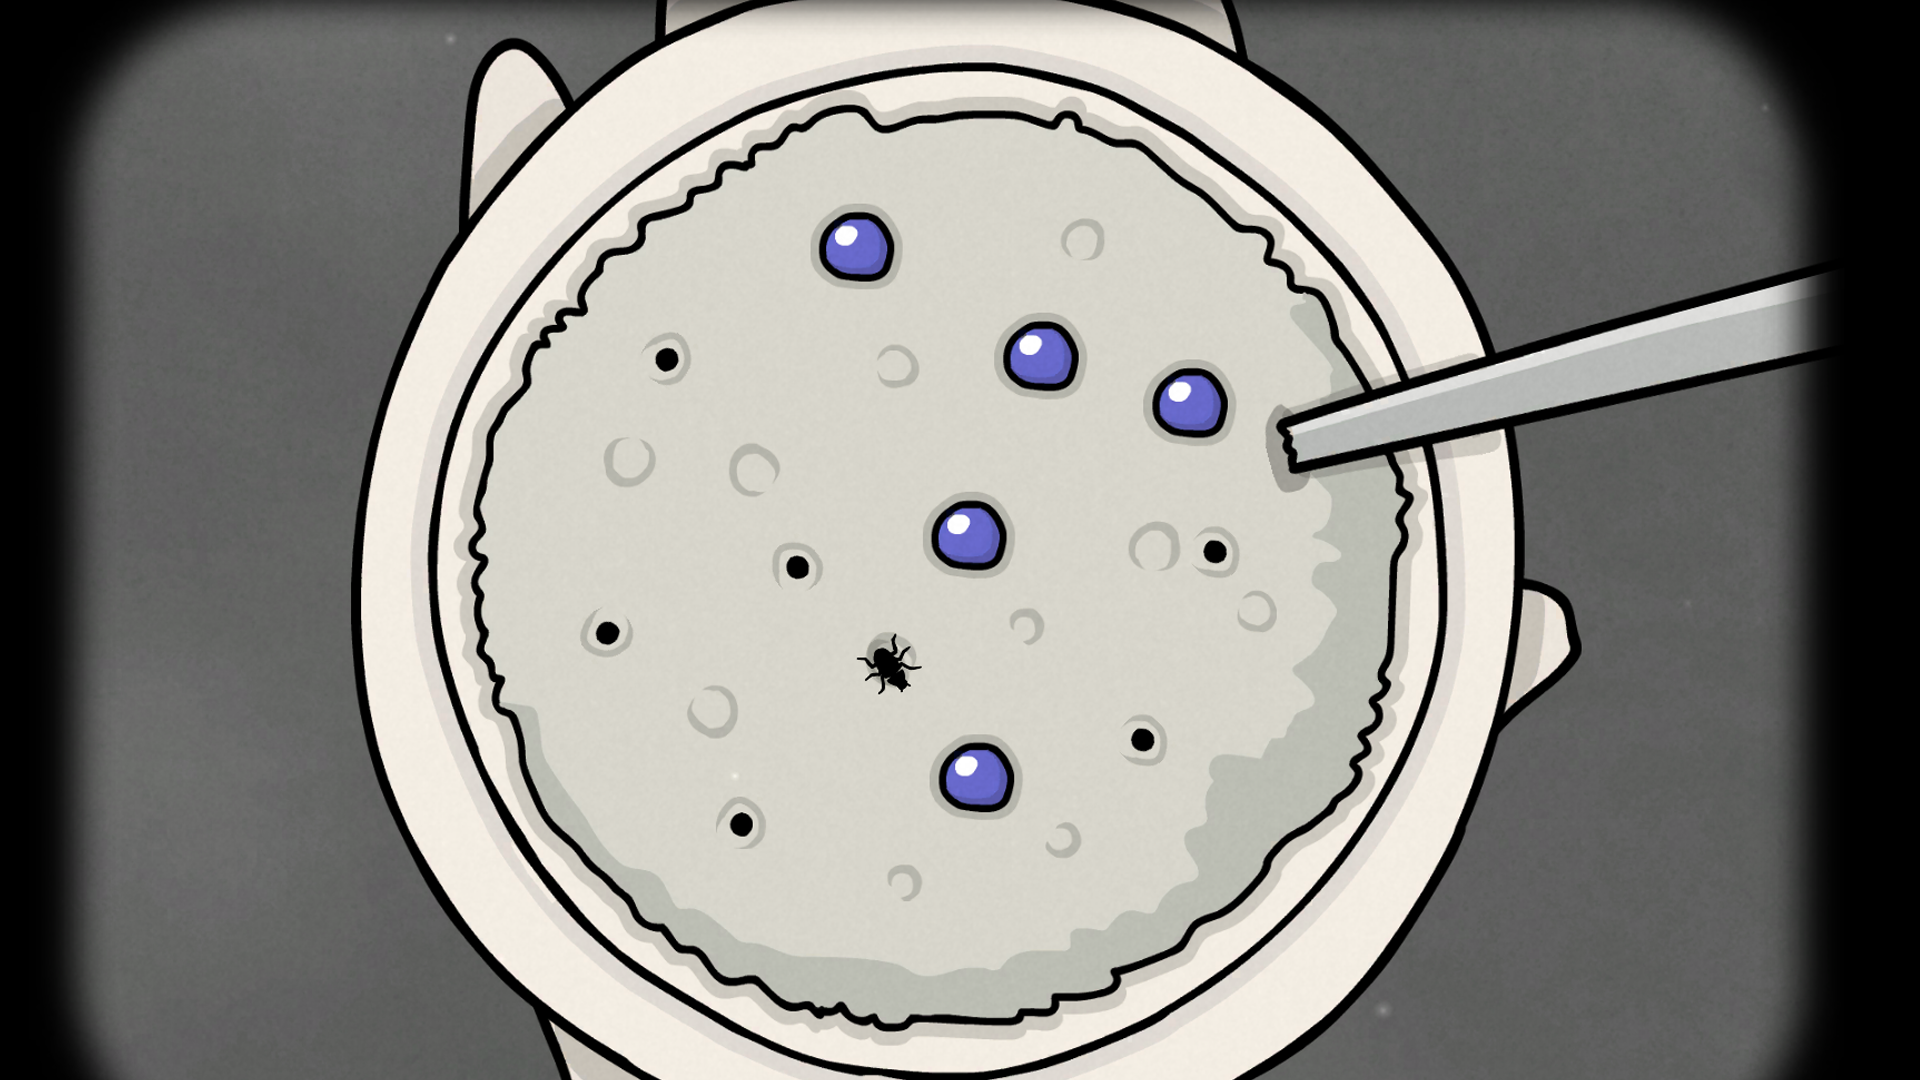
After smashing the bug you can finally feed Aldous.
Collect the slipper from in front of Aldous’ bed and solve the Exercise puzzle:
Interact with the tin soldier and have Aldous copy those movements.
Solution: Left Right Down Right Right Down.
Dress Aldous, don’t forget his slippers, and look out of the window to finish the level.
Preparing the Reception
Start the level by cleaning the cat poop in the entrance hall, the Servant’s Room, and in front of Aldous’ bedroom using your cloth.
Interact with the maid until she gives you the feather duster.
Dust the three paintings in the hallways and make notes of the numbers they tell you:
William - 3
Alexandra - 2
Aldous - 4
Interact with the maid again; this time she’ll give you a candle.
Open the box next to Aldous’ Bedroom using the numbers you found on the paintings; the code is 243.
Collect the candle that comes out of the box.
Finally, collect the candle on top of the table in the Servant’s Room.
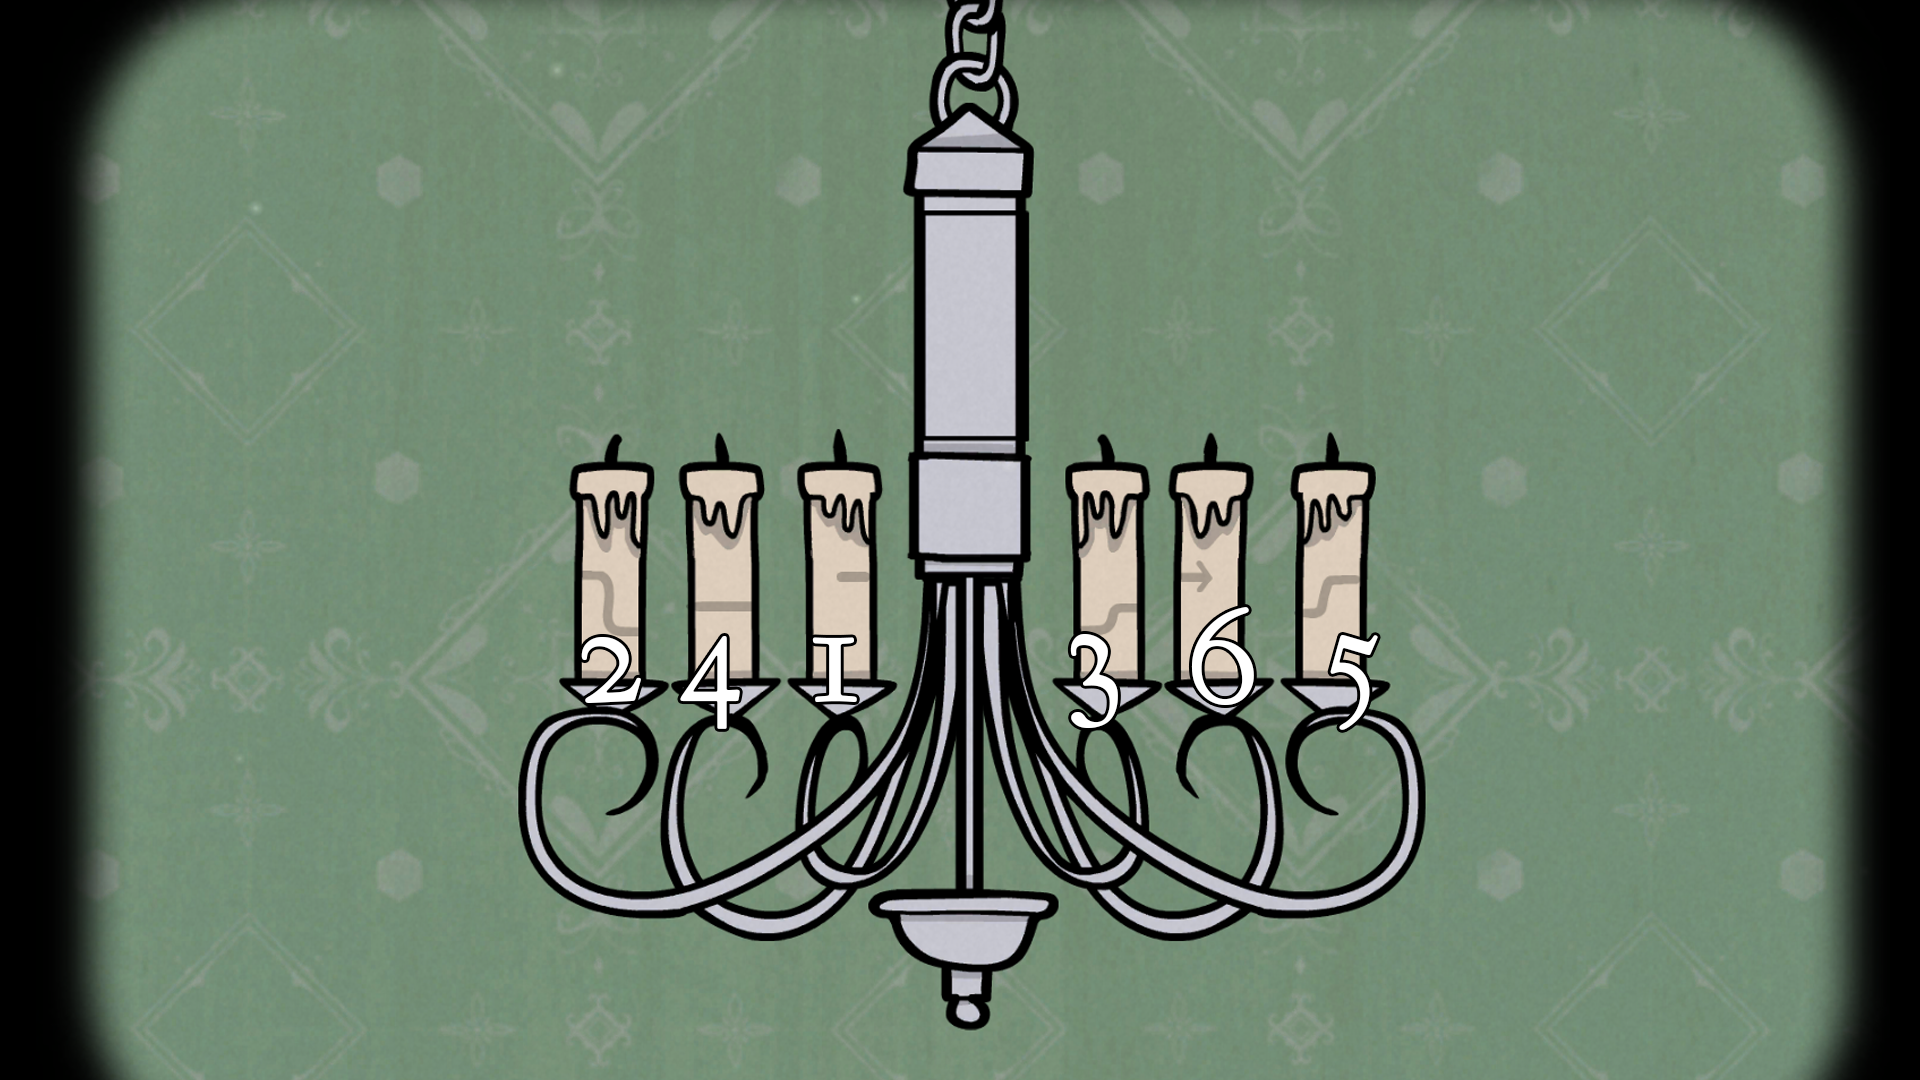
Place the three candles on the candelabra in the entryway and light them correctly using the matches.
To solve this puzzle, light the candles in the right order by following the path on the candles.
Follow the correct path from left to right.
Talk to the maid again and enter the garden to finish the level.
Welcoming the Guests
Time to welcome the guests.
First things first: grab the milk jug on the porch and milk the goat.
After filling up your jug, check out the hole the goat dug and pick up the small key.
Use the small key to open the mailbox and collect the stone tablet.
Now get rid of the cockroach infestation.
To solve this puzzle, use the white stone to guide the cockroaches into the hole; make sure they do not walk off the field or get stuck!
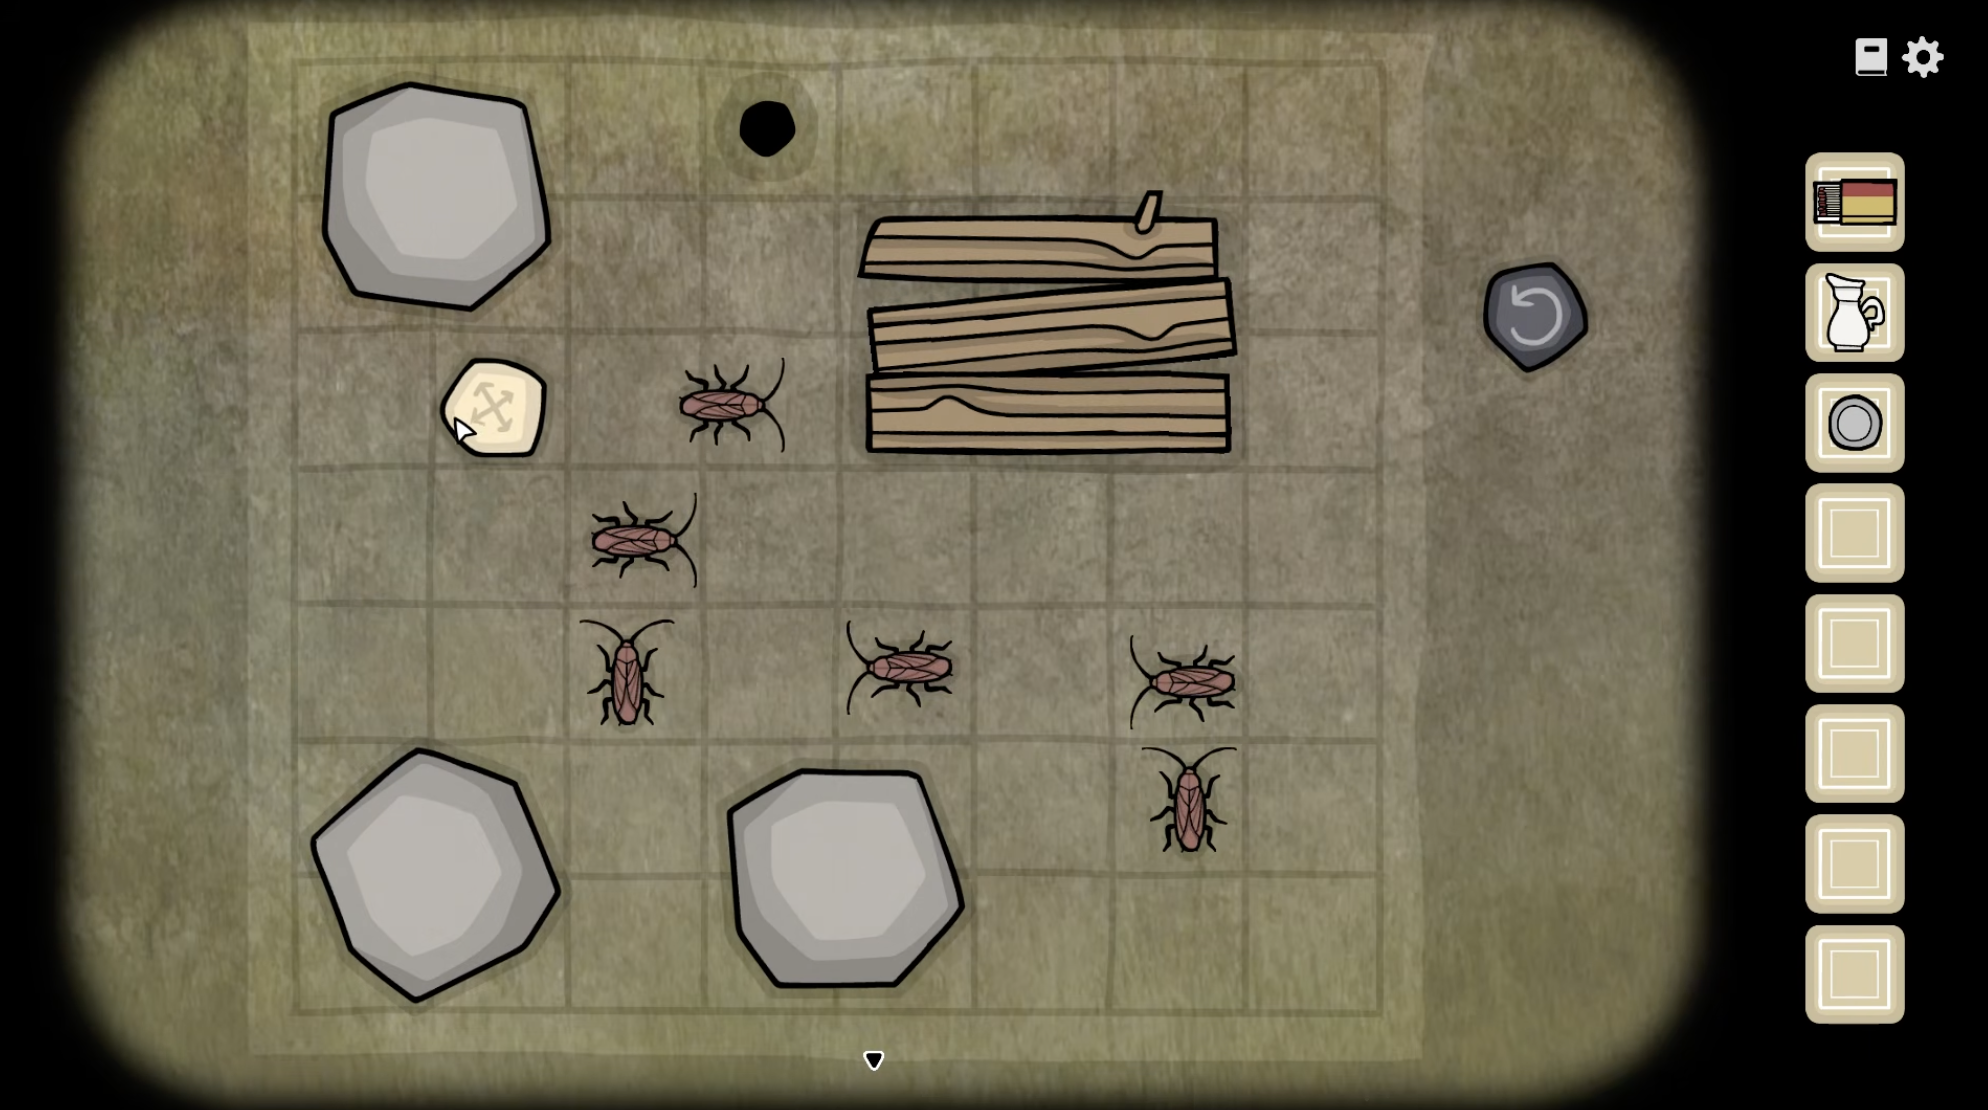
Collect the stone tablet that appears from beneath the wood pile.
Now prepare the bouquet: to solve this puzzle, make sure the flowers combine into the right flower at the top of the “pyramid.”
Note the diagram on the vase and the details of the flowers.
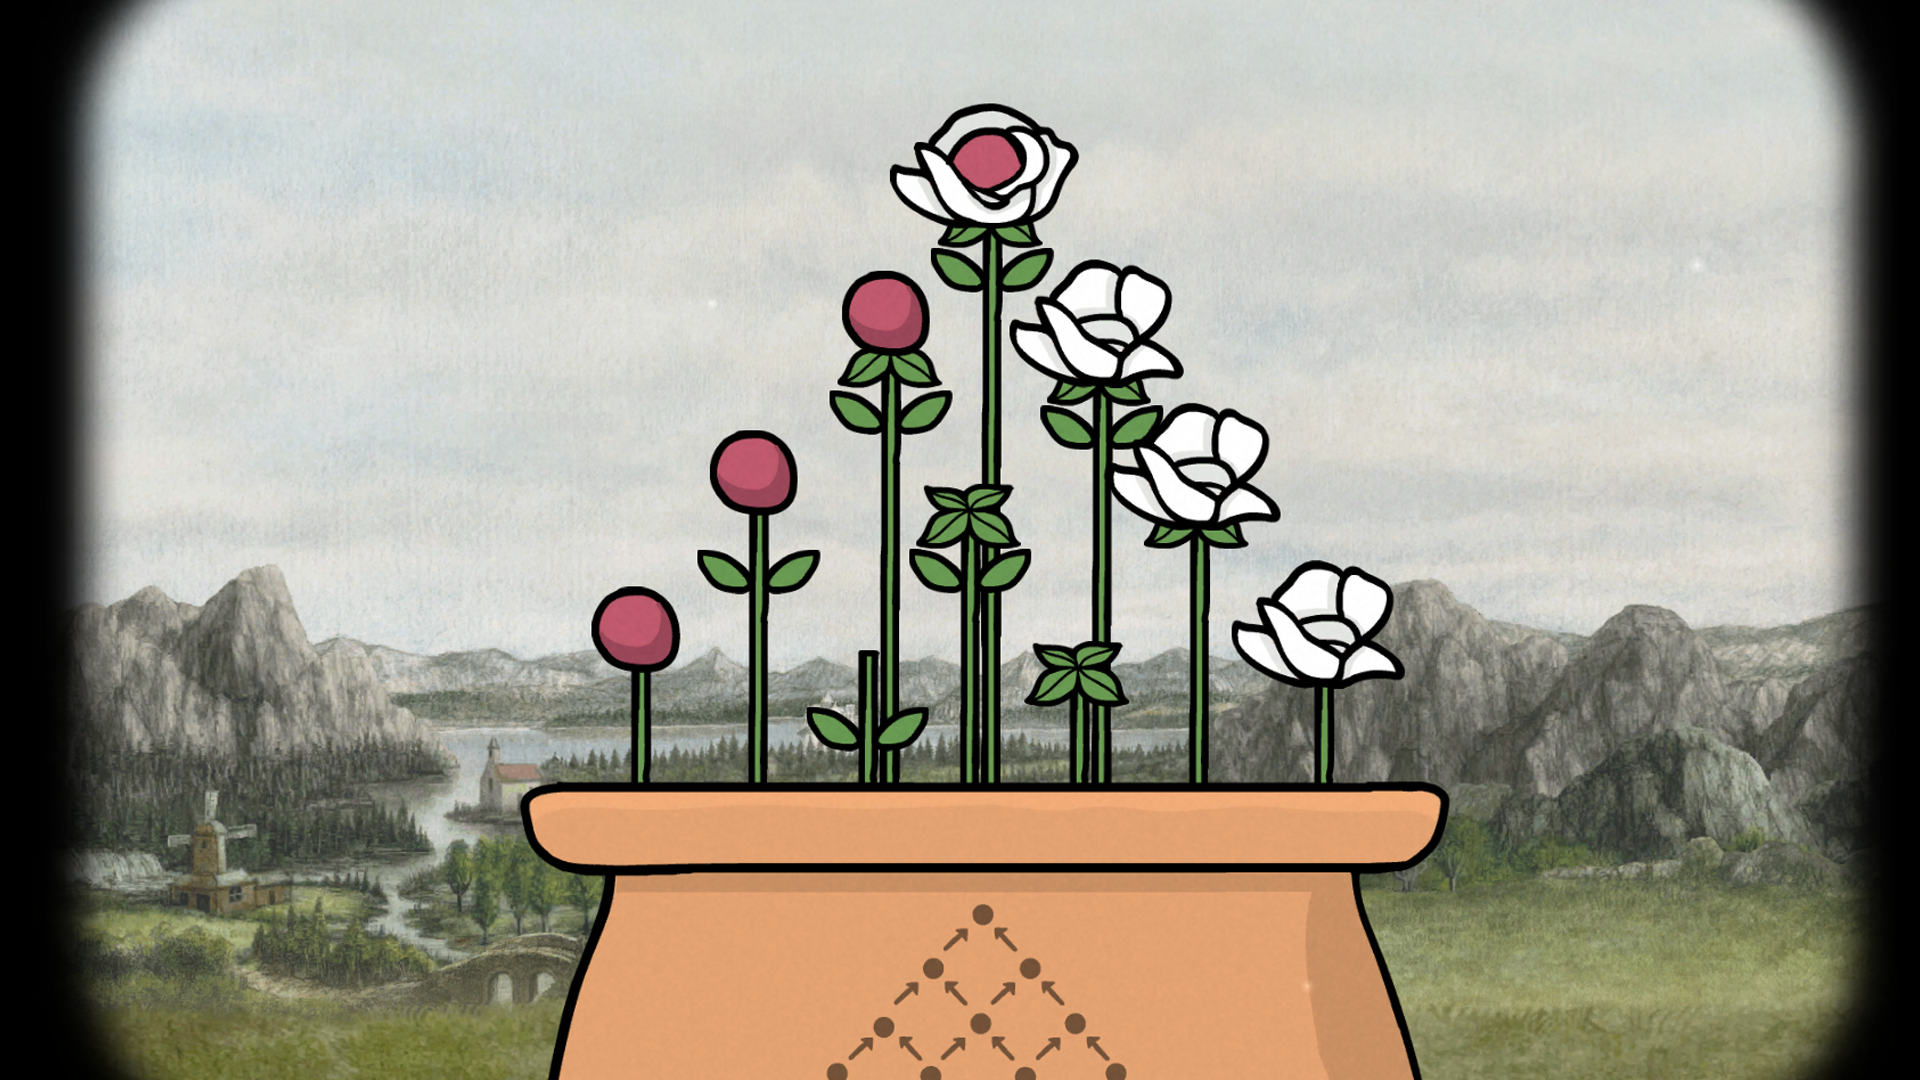
Collect the flowers and the final stone tablet.
Add all the stone tablets to the locked box on the porch and unlock the box. To unlock the box, place the stone tablets in the correct slots and note the drawings on them. Think about what fits inside every depicted image.
Solution:
House > Cupboard > Elixir > Droplet
Tree > Nest > Egg > Bird
Pick up the flag and attach it to the pole. Raise the flag to signal the coachman; the guests will arrive.
Open the curtains and talk with Alexandra until she asks for her flowers.
Pull the luggage of the carriage and unlock Alexandra’s suitcase.
To solve this puzzle, shake the wicker basket to reveal the code: 374
After opening Alexandra’s suitcase, reorganise her luggage.
To solve this puzzle, make sure none of the clothes overlap.
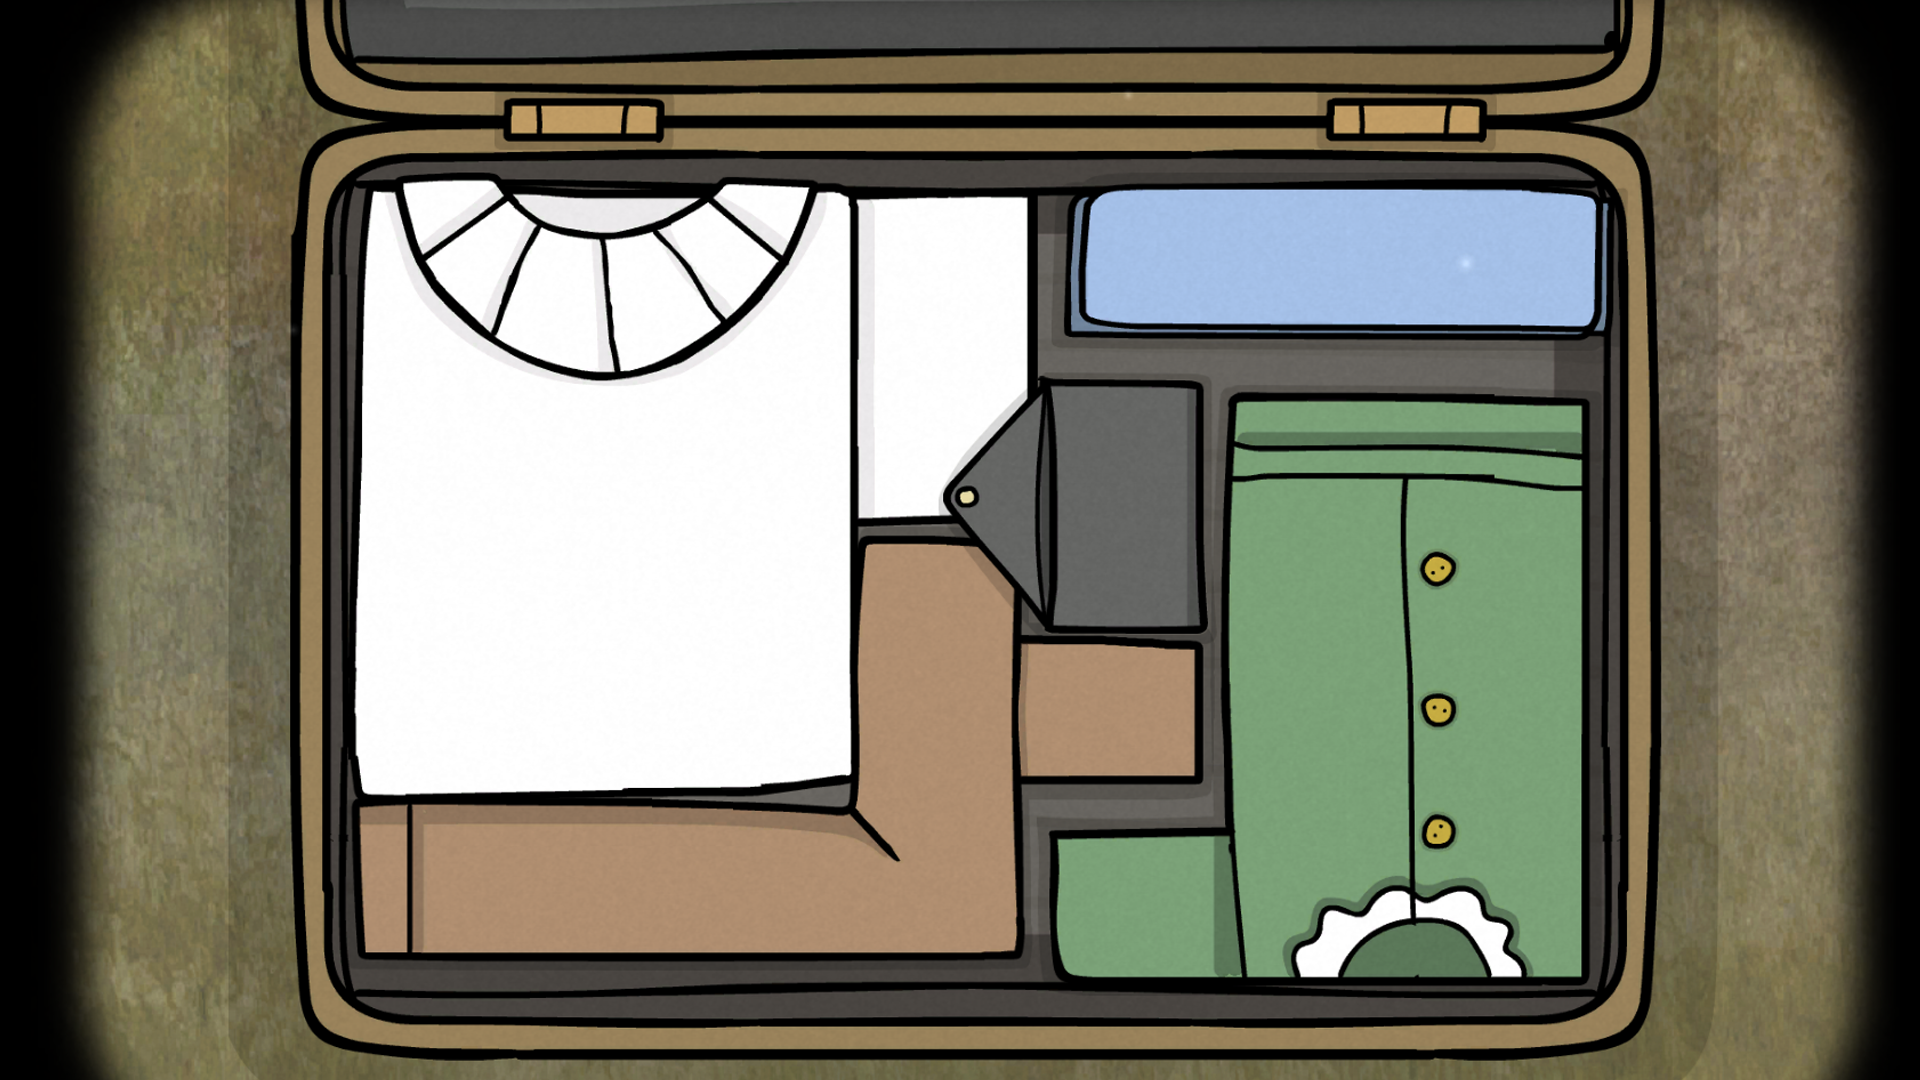
Grab the coin and the bill from the purse, give the bill to the horse and the coin to the coachman.
Talk to the coachman and then to Alexandra to finish the level.
Serving Tea
Alexandra is very particular about how she takes her tea.
Enter the Servant’s Room and talk to the maid until she gives you sugar, then grab the tea from the table and the kettle with hot water from the stove.
Head out and interact with Rustie until you obtain the sticky substance.
Find a tea cup in the cupboard next to Aldous’ Bedroom and give it to Alexandra.
Make Alexandra’s tea by filling her cup with tea, water, milk, and sugar; pay close attention to her instructions.
If you mess up her tea, simply put the cup back together and glue it using the sticky substance.
After Alexandra has had her tea, go into the Living Room to finish the level.
Opening the Reunion
Everyone is here, it’s time to help Aldous with his speech!
Grab the wood from the floor and check out the painting above the fireplace.
To solve the painting puzzle, click the items in the correct order; pay attention to the painting title.
Solution: Timepiece, Book, Elixir, Fish.
The fish will be added to your inventory.
Start a fire in the fireplace using the wood and matches, and grill the fish.
Collect the grilled fish after it's done cooking. Open the cupboard and solve two puzzles in there:
To solve the fly and tree puzzle, guide the fly to the six pink bulbs using the wooden sticks with the arrows.
Solutions:
Left, Left, Left, Right
Left, Left, Right, Left
Left, Right, Right, Left
Right, Left, Left, Left
Right, Right, Left, Left
Right, Right, Right, Right
Collect the fly eggs from the tree.
To solve the locked wine box puzzle, create the year on the paper using the segments on the locked box.
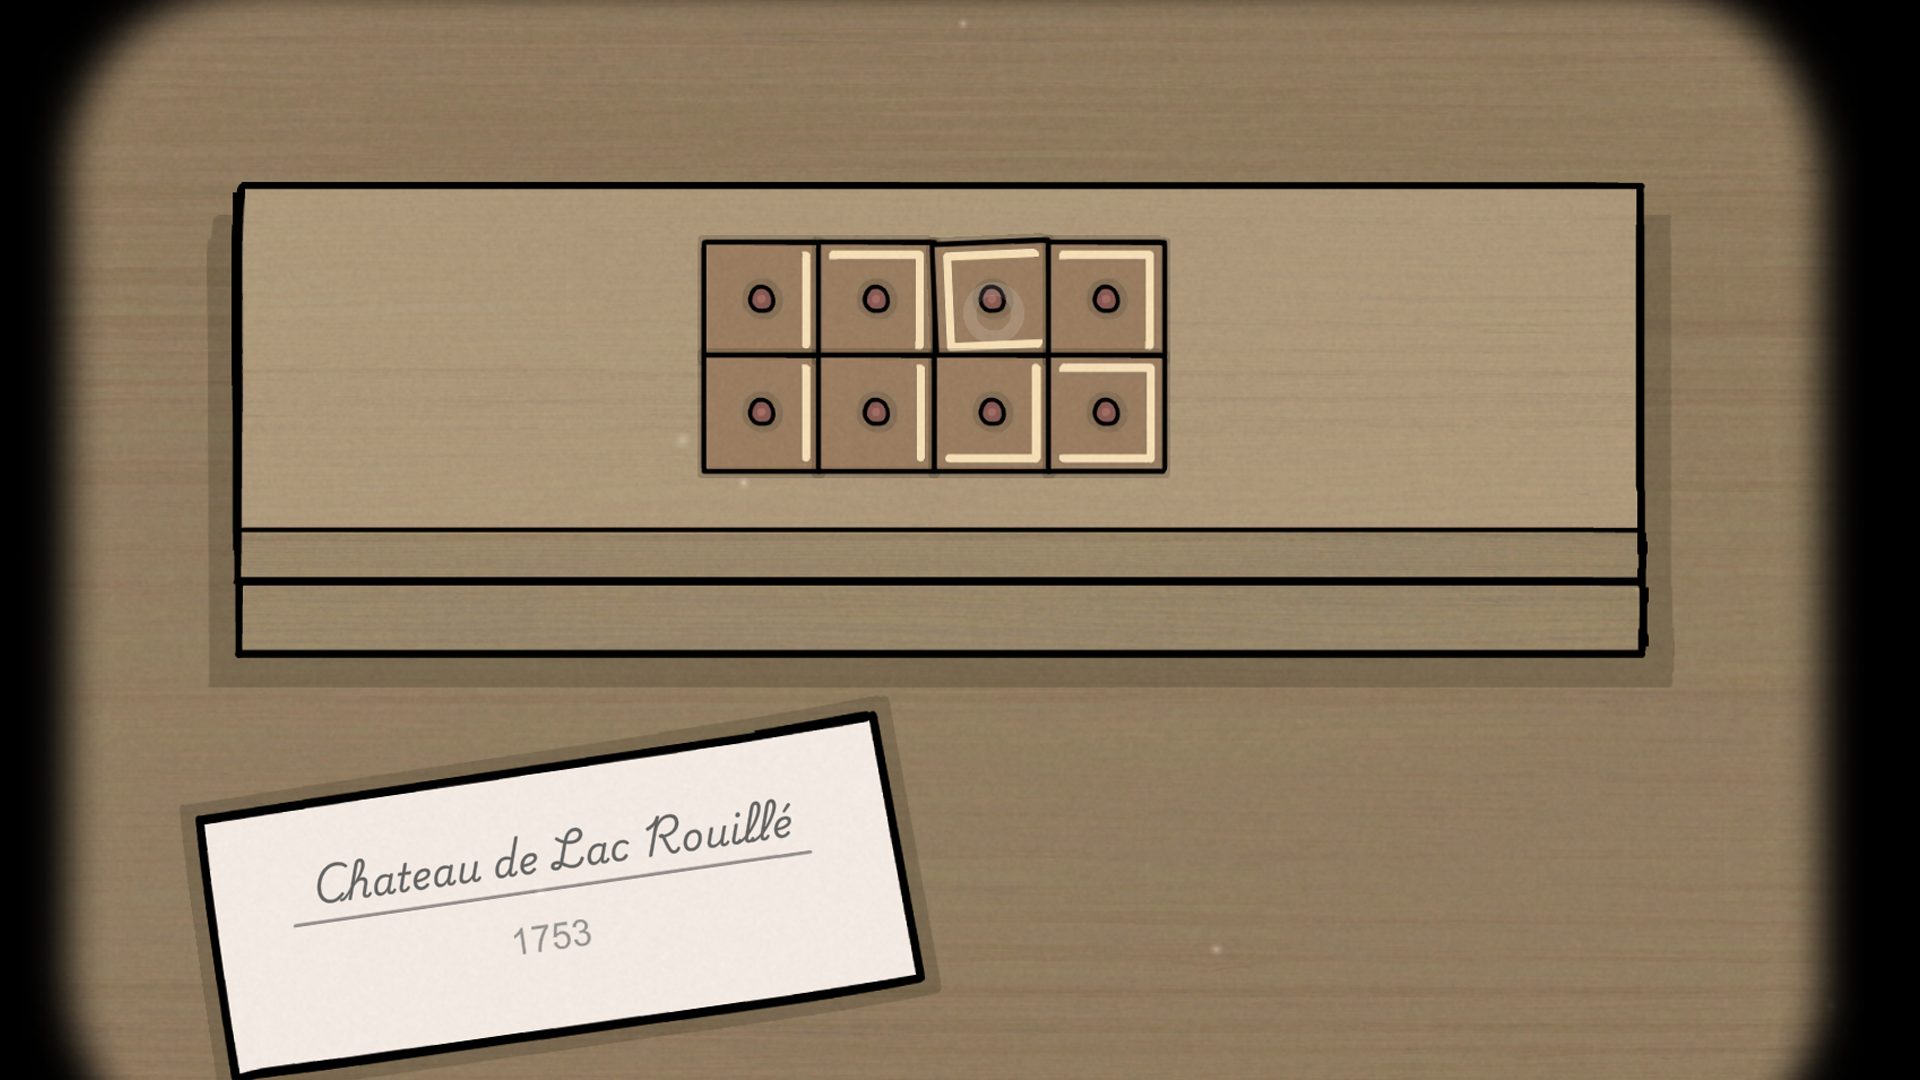
Collect the bottle of champagne from the box and the glass standing next to the box.
Hand the glass to Aldous and fill it with the champagne.
Let William in through the window; after he sits down, give him the champagne.
Now it is time to open the final box in the cupboard.
To solve this puzzle, fix the shards of the bottle on the floor and press the buttons on the box in that order.
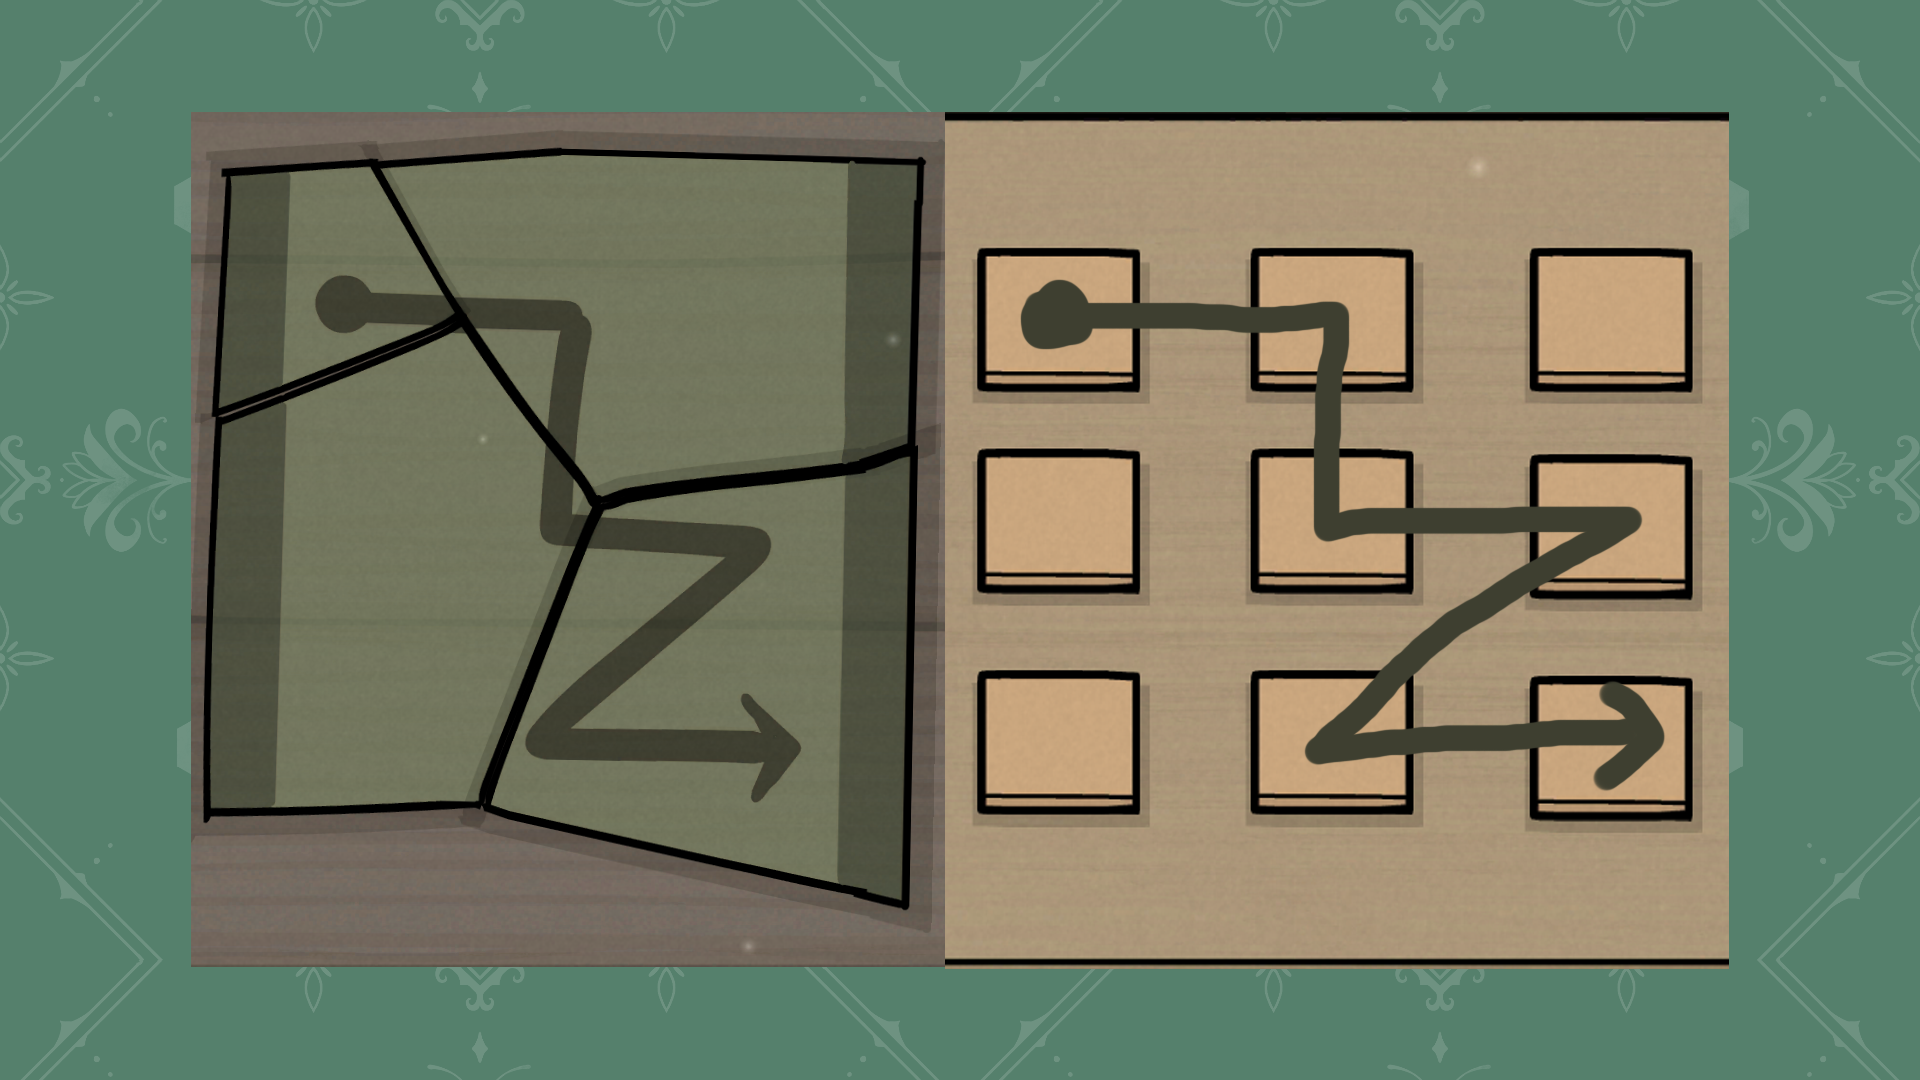
Grab the cigar from the box, give it to William and light it.
Immediately after it’s time to put out a fire.
Use the teeth to control where William’s spit goes to put out all the flames.
Collect the spoon and head to the bread plank.
Add fish and fly eggs to the plank, collect three pieces of fish on toast and hand them out to everyone.
After everyone’s had their bite, use the spoon on Aldous’ glass and let Aldous start his speech.
To calm James down, follow Alexandra’s instructions as she sings to him.
Solution (Click the following in order):
James’ eyes
The moon
Alexandra’s hand
Alexandra’s ring
Alexandra’s necklace
Alexandra’s mouth
The cloud
Alexandra’s eyes
Return to Aldous so he can continue his speech.
Now wake up William.
To do this click where his eyes are looking at either his tie, hat, or ear. This puzzle is randomised, and there is not one solution.
After William wakes up, return to Aldous once more so he can finish his speech and finish the level.
The Night Watch
Enter the Servant’s Room and listen to the maid’s instructions:
In this level, you have to look around the house and see if anything is out of the ordinary. If there is, ring the bell; if nothing is wrong, blow out a candle. You must do this correctly three times in a row.
When looking around the hallways, keep an eye out for the following:
Shadowy apparitions
Missing pets
Broken paintings
Open doors
If you spot any of these, ring the bell the maid is holding.
After successfully making the rounds, search the hallways for William and interact with him.
Talk with him until he gives you a walking stick.
Use the walking stick on the trapdoor above Aldous’ Bedroom and climb up to finish the level.
Searching the Attic
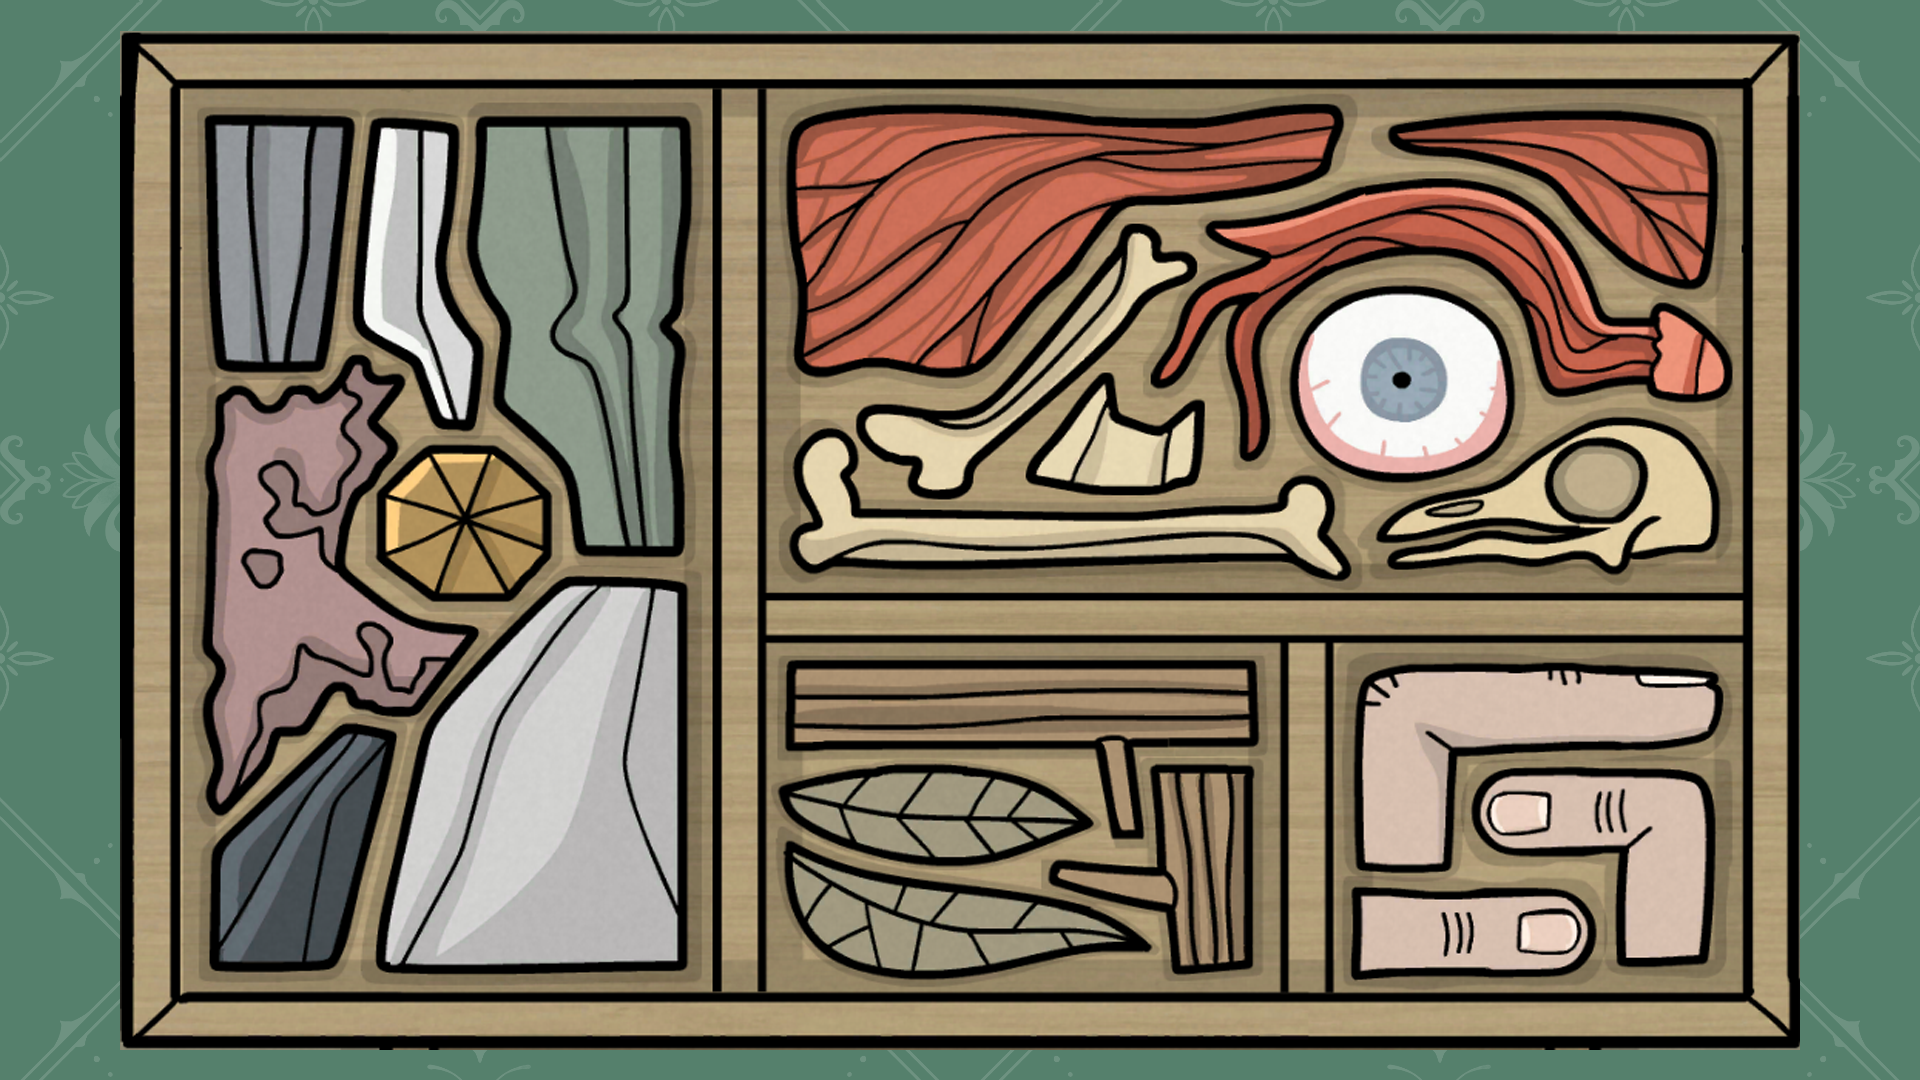
William’s asked you to poke around the old family stuff in the attic. What will you find? Let’s start with some clean up.
Go to the tray on top of the table and organise it.
To solve this puzzle, organise everything in the correct slot and make a note of the different “themes” of items.
After solving the puzzle, collect the candle, place it in the lantern, and light it.
Collect the small statue on the left and open the box on the floor.
Solve the puzzle in the box.
To do this, follow the story and place the correct pieces on the paper, in order:
In order:
Soldier, Soldier and Woman
Square and triangle
2 soldiers and woman
Soldier and horse
Soldier and soldier with gun
Woman and triangle
Woman and square
Open the square to collect a small key.
Use the small key on the purse to collect another small statue.
From the drawers, collect yet another small statue and a rung.
Now it is time to open the box next to the table.
To do this, move the clouds outside to reveal different constellations. Pay close attention to the symbols on the box when looking for constellations.
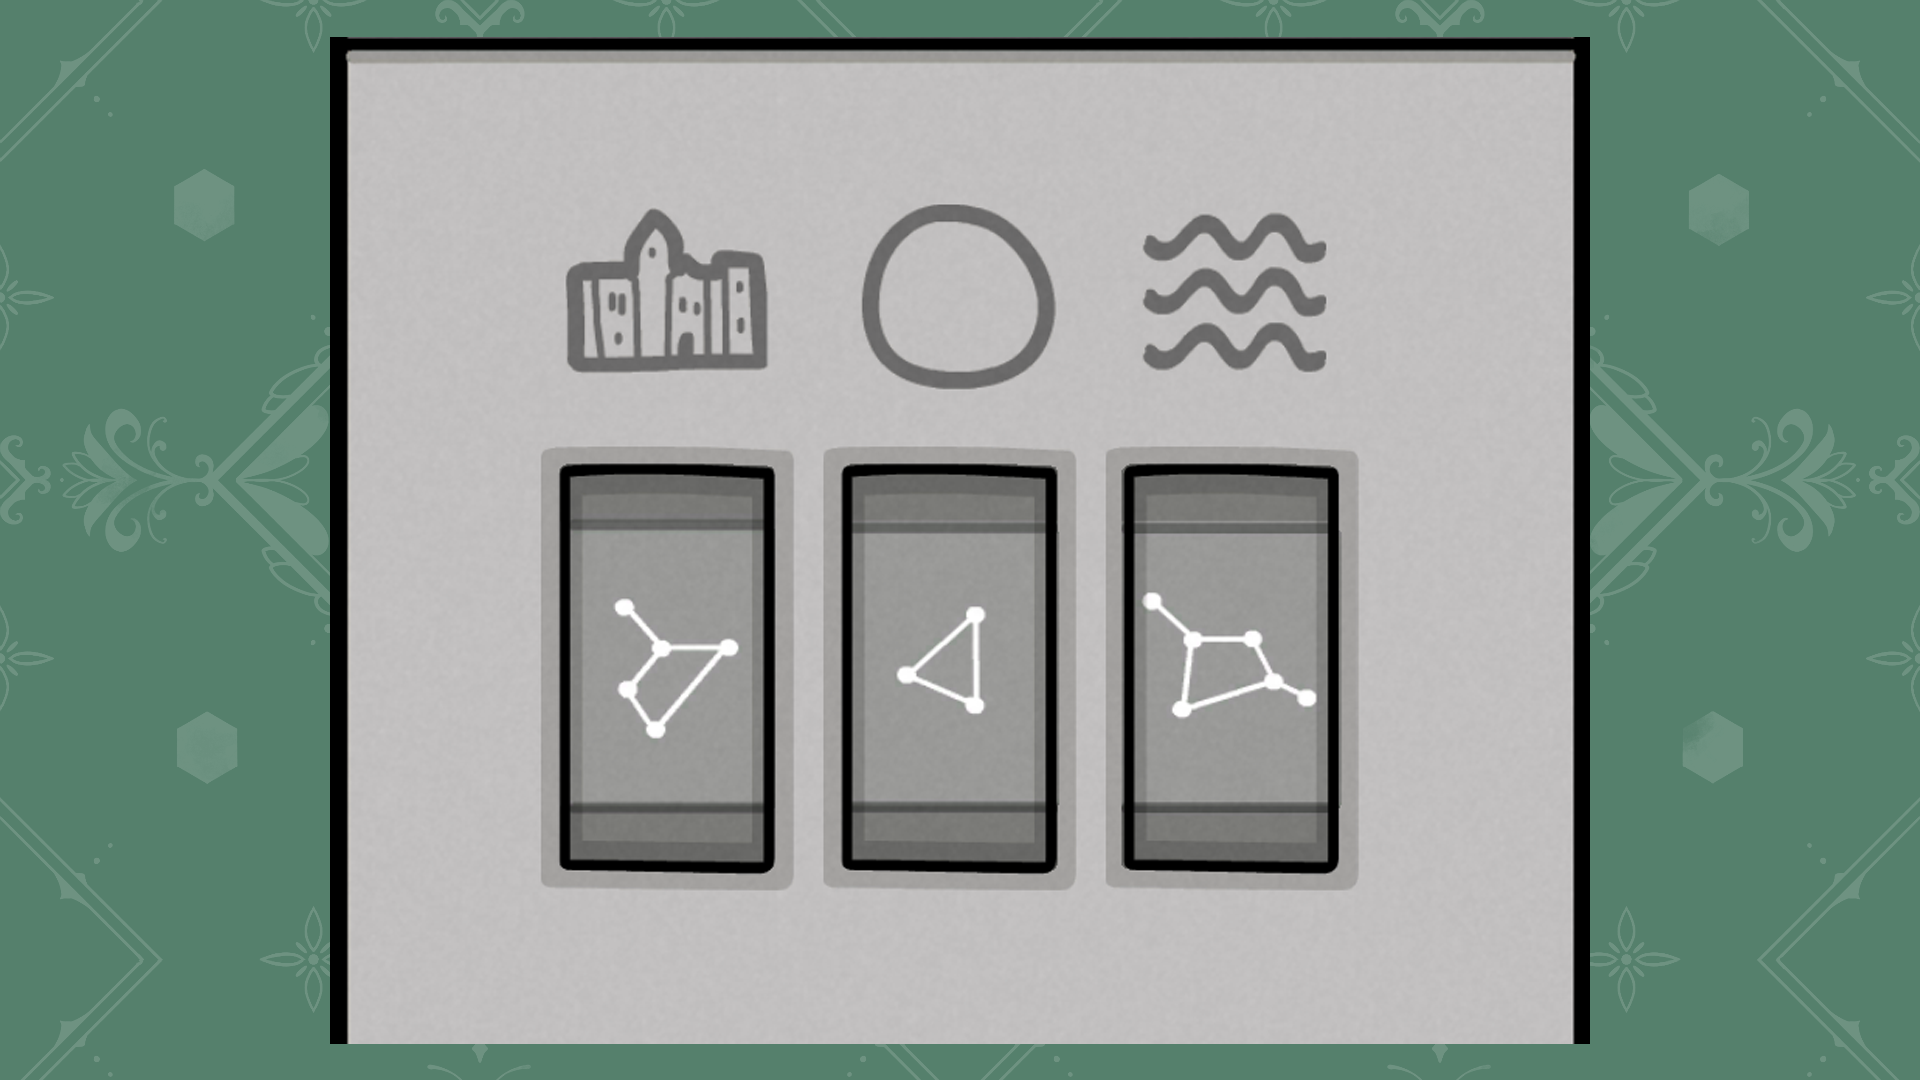
Collect the final small statue.
Now open the golden box on top of the drawers using the small statues, match each statue with its natural habitat.
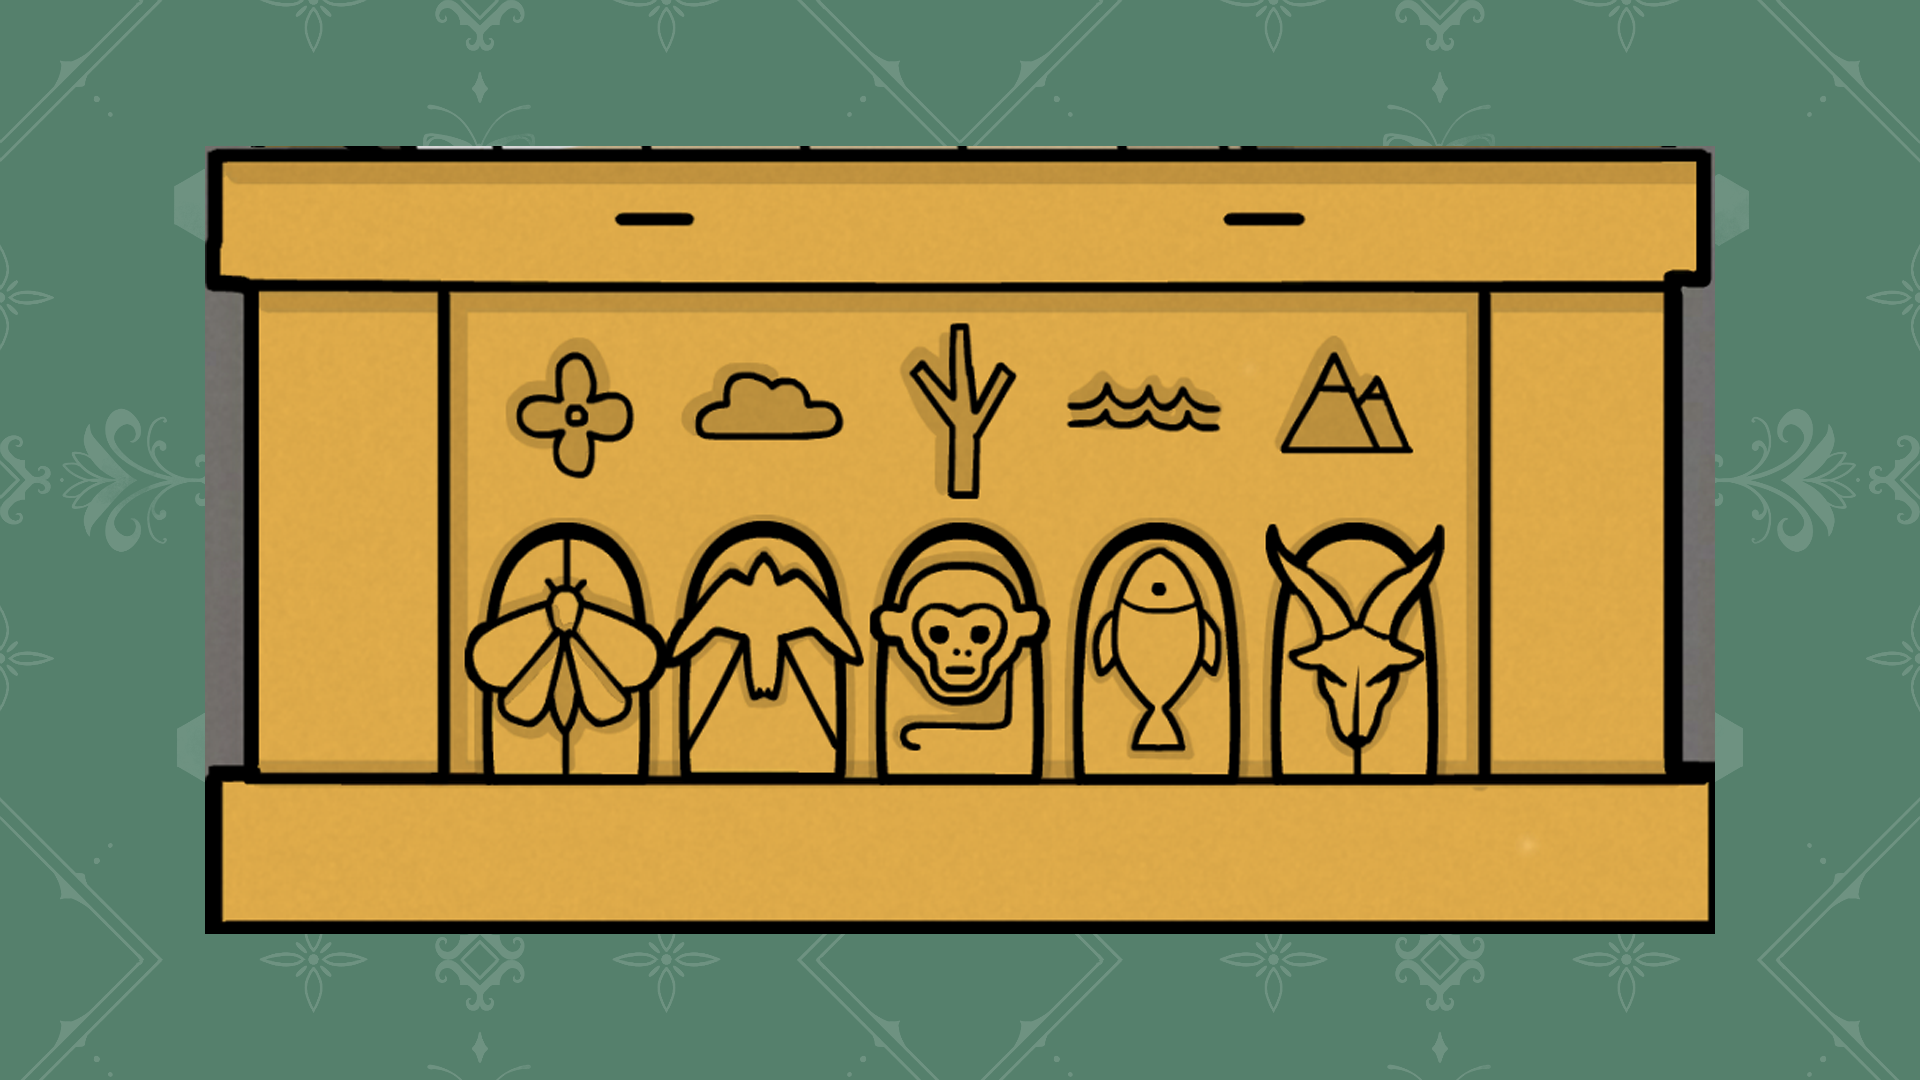
From the box, collect a second rung and the special scroll.
Add the rungs to the ladder and open the door to finish the level (and your first day as a Servant).
DAY 2
Preparing Coffee
Good morning! Time for another day at the Vanderboom house!
Start by checking in with the maid who is waiting for you.
After talking to the maid, open the box in the Servant’s Room.
To do this, find out what numbers the Vanderboom siblings are pointing to. You can find this out by clicking on all the windows on the house painting up the stairs and checking the portraits of the siblings in the hallway.
Solution: 315.
From the box, collect the coffee beans and grind them upstairs to obtain the ground coffee.
Add the ground coffee to the pot on the stove and collect the coffee pot after it boils.
Find Aldous and pour his coffee, then look for the maid and talk to her.
After talking to the maid, head inside William’s Room to finish the level.
Waking up William
Rouse William from his deep slumber!
To start, unlock the clock in his Room: find the time hidden in the wardrobe and set it on the clock.
Solution: Set the clock to 9 PM.
Now solve the puzzle inside the clock.
To do this, put the items in the slots in the correct position, use the family portrait hanging above William to figure out their correct spot.
Be sure to grab the hat from the wardrobe as well.
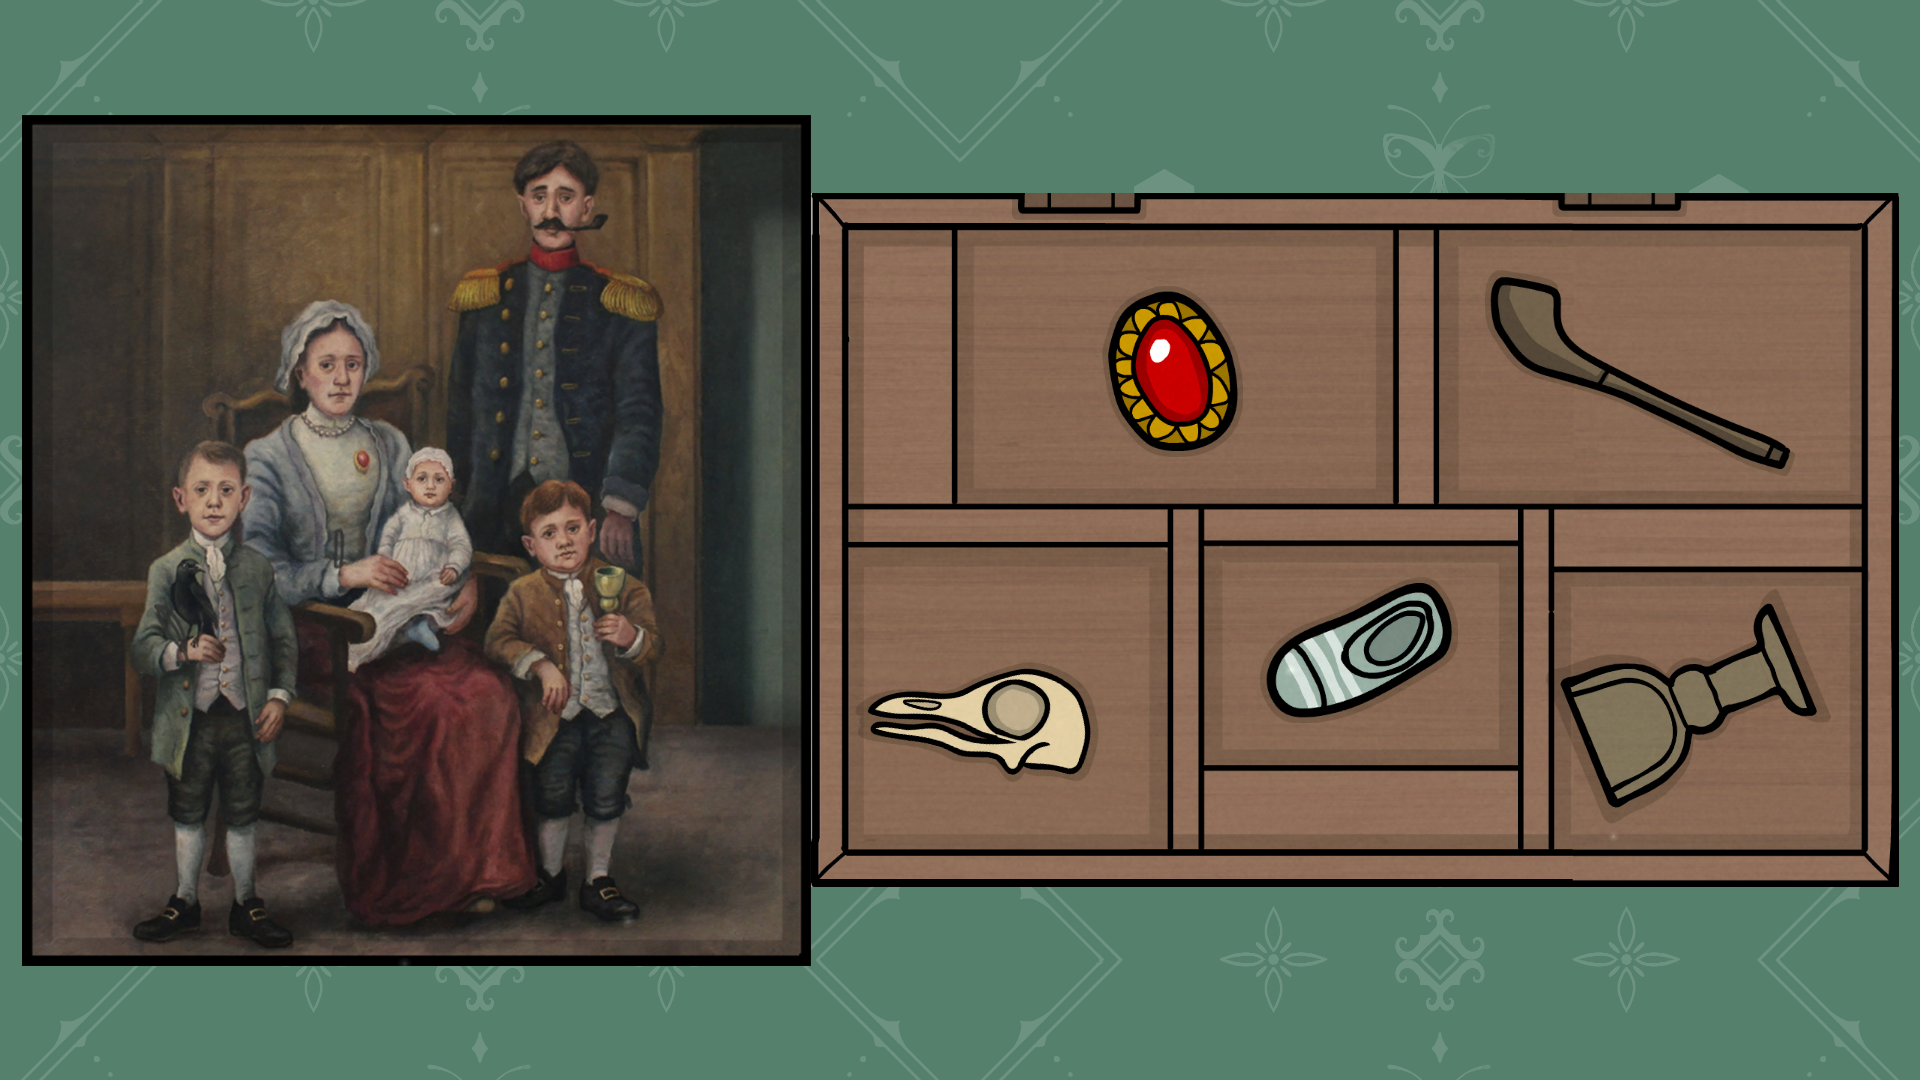
Collect the cup.
Use the cup on William’s mouth to collect the cup with liquid.
From the bird poop on the floor, collect the seed.
Use the seed on the pot on the table and water it to obtain birdseed.
Feed the seed to the parrot and grab one of his feathers.
Now use the feather on William’s toes to start waking him up.
To solve this puzzle, use the feather on a toe, carefully look at where the toe is pointing, and then tickle that toe next (count!). This puzzle is randomised, and there is not one solution.
After successfully tickling William, grab the small key from the floor and open the box on the table.
From the box, grab the eye drops and knob.
Use the knob on the windows. Open the windows and use the cup to refill it with liquid.
Water the pot once again to collect more birdseed to feed the bird to obtain an egg.
Now give William his eye drops and coffee.
After he’s dressed, talk to him and give him his hat and egg.
After that, grab the spoon from the table and use it on the egg.
Talk to William again and do as he says: put the scroll on the table.
Unlock the scroll by forming a fish using the rotating rings.
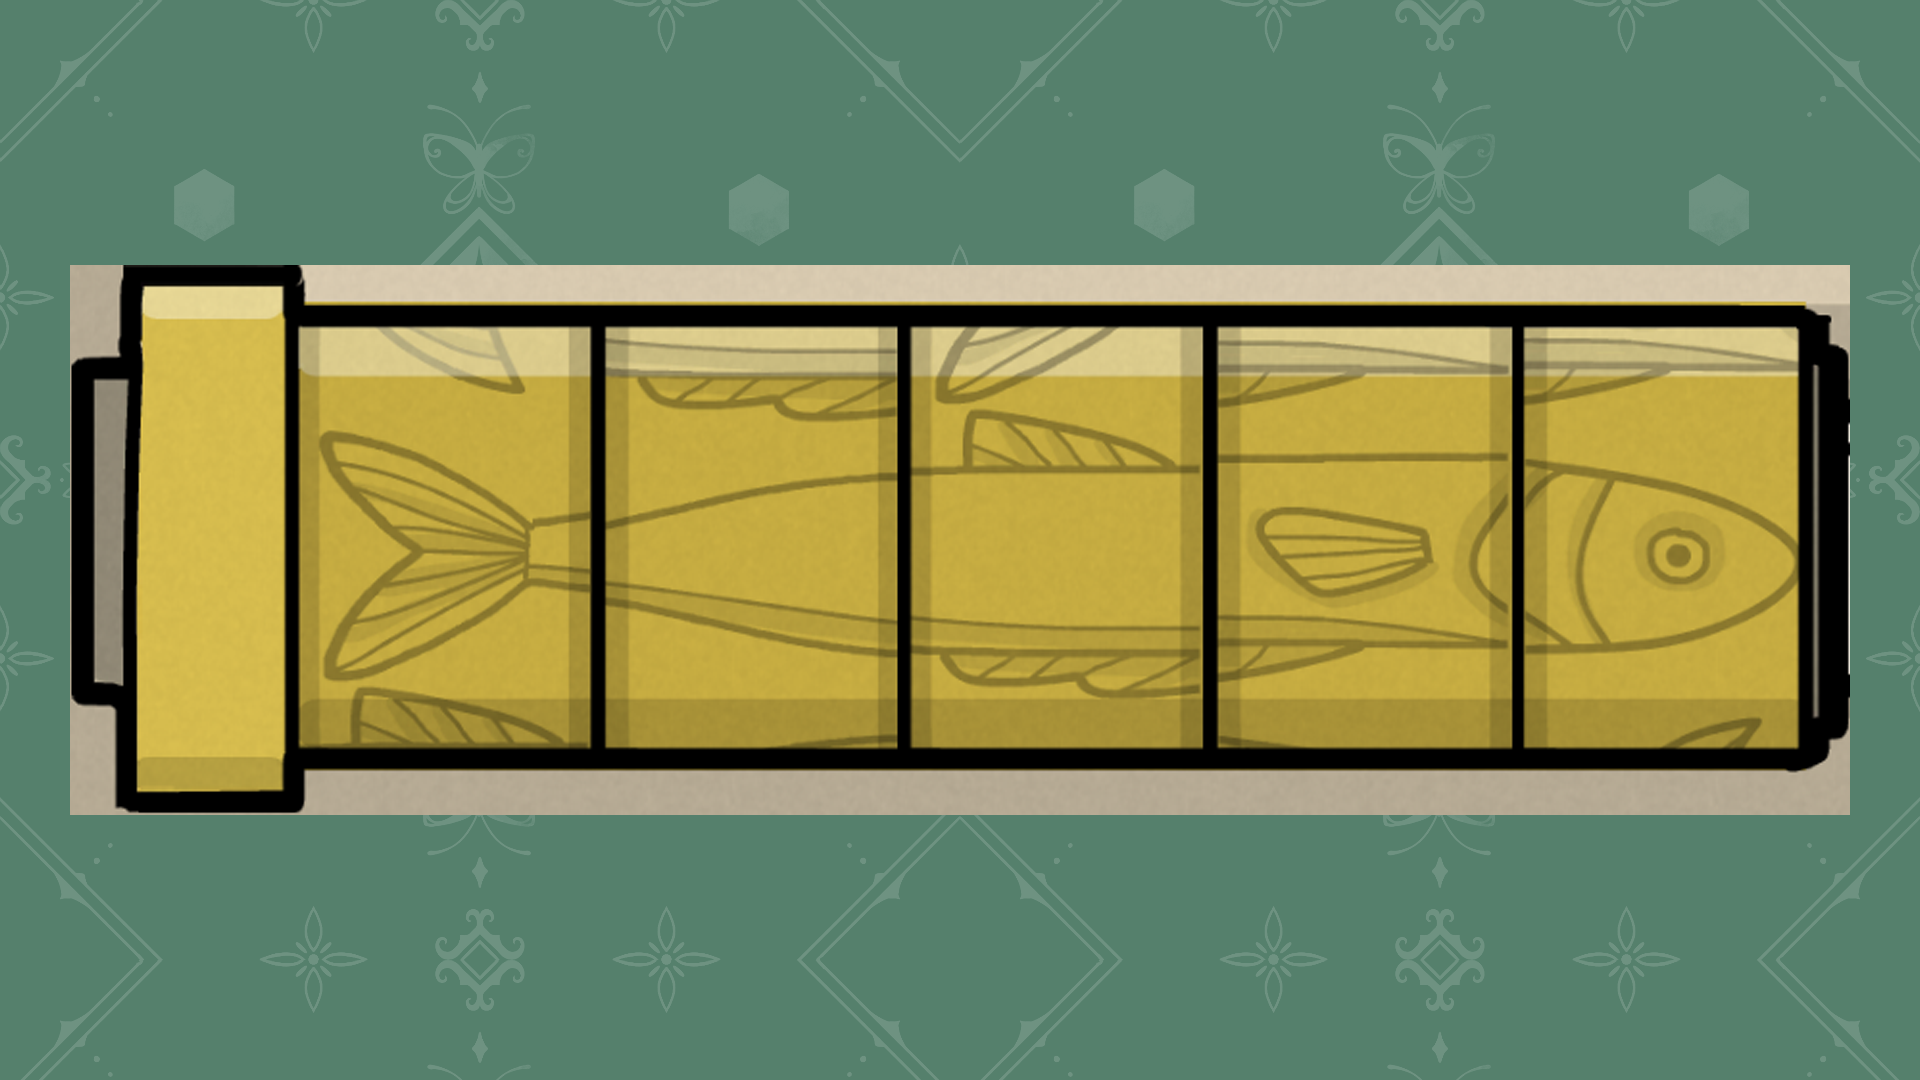
Now it’s time to decipher the scroll.
Read the story carefully and have William point at the images in the correct order.
Solution:
House (top left)
Cave (bottom right)
Door (top right)
Timepieces (middle)
Book (bottom middle)
Elixir (top middle)
Enlightenment (bottom left).
Talk with William again to finish the level.
Cleaning the Floors
After waking up William it’s time to get back to cleaning.
Find the maid in the hallways and talk to her.
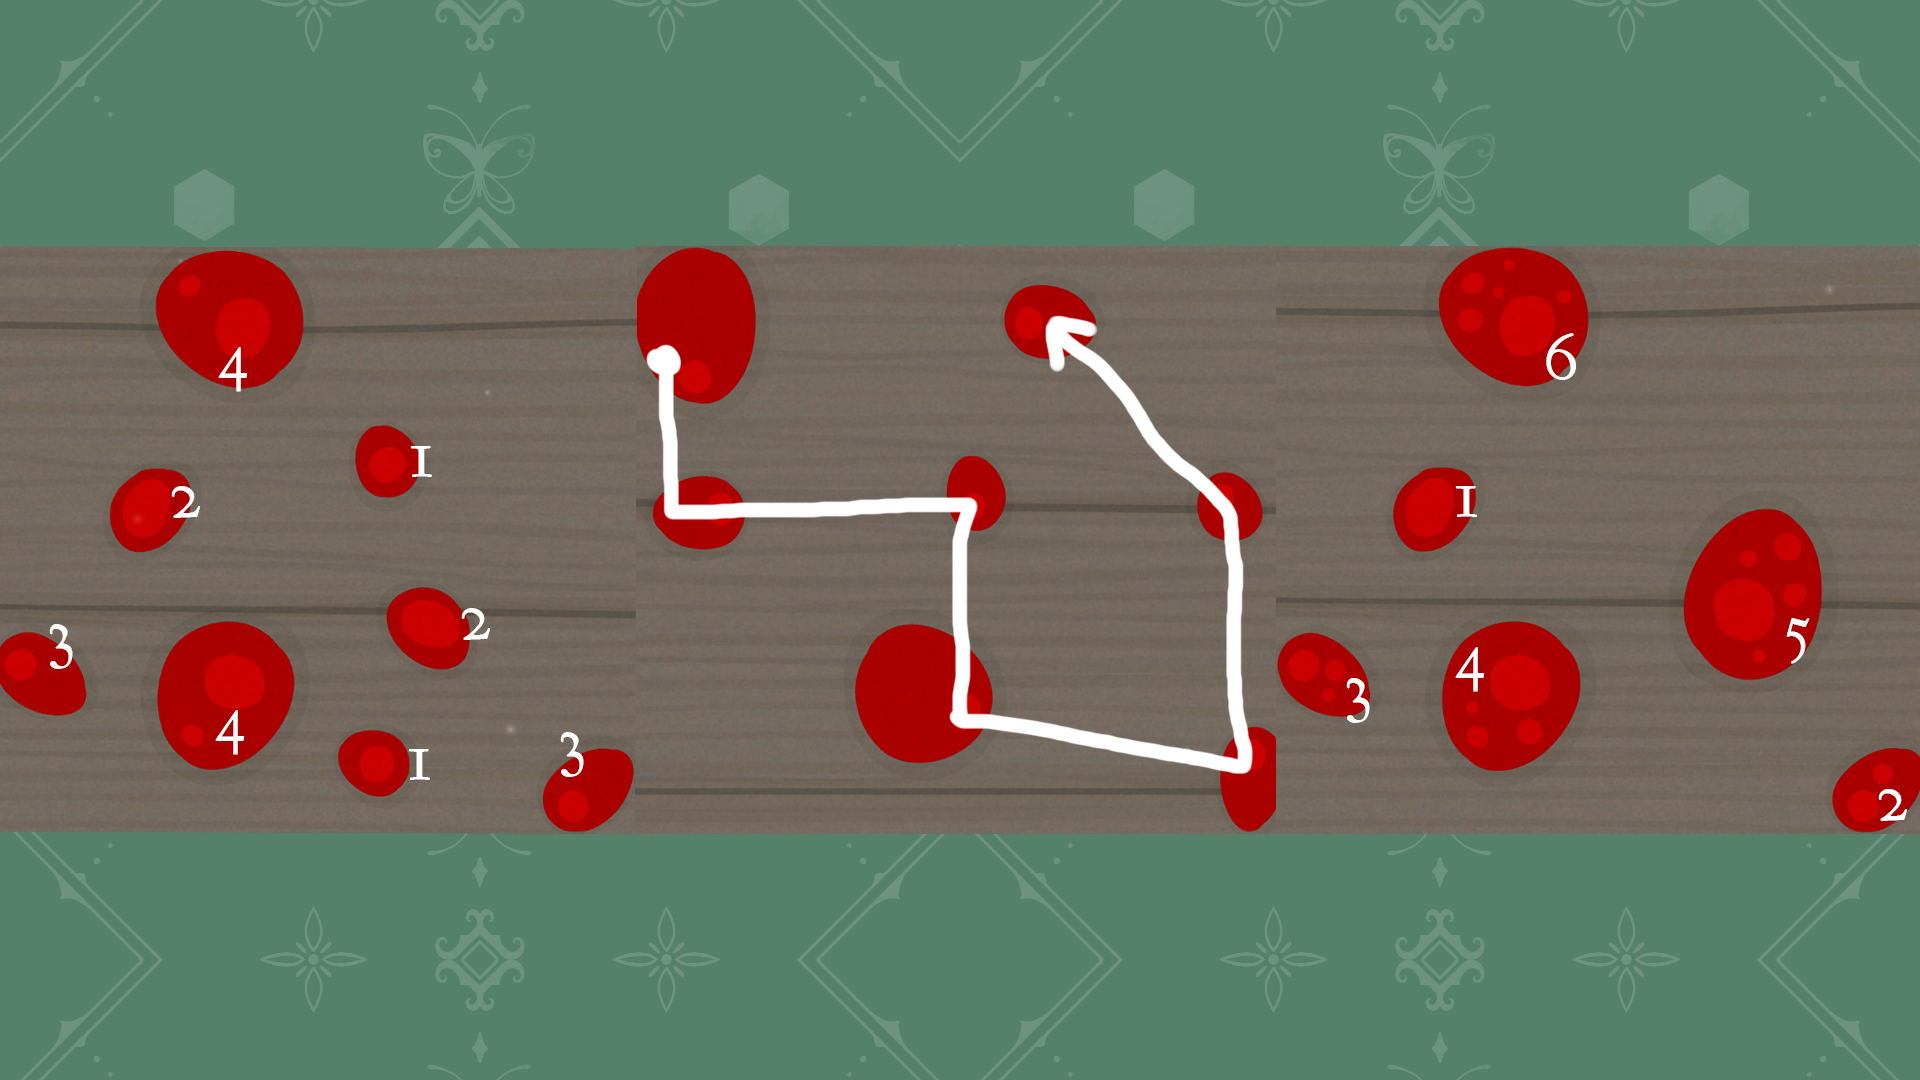
Grab the scrubber from the maid’s bag on top of the table upstairs and clean the stains around the house.
For the stain near the Bathroom: Follow the “direction” of the blood.
For the stain near the maid, count the amount of circles.
For the stain in the Servant’s Room, match pairs.
Look through the keyhole in the Bathroom, after go to the balcony and climb the ladder to finish the level.
Going Hunting
Ready for a hunt?
Talk to Aldous until he gives you a rifle.
Grab the bullets on the tree stump and place the rifle there.
The hunt is on!
Use the paper on the table to figure out where all the animals are and use the gun to shoot them.
If you run out of bullets, you can replenish them at the tree stump.
Note that the Deer will only appear after shooting William twice, and the Boar and Rabbit will only appear after you shoot some bushes near the road and a rock in a field.
After successfully hunting down all of your targets and after Aldous returns with the meat it’s time to open the shed.
To do this, use the letter on the ground to figure out what number matches which sense. Drag the animal parts on the table to find out. Solution: 91276
Go into the shed and collect the butcher knife and cloth.
Hand the knife to Aldous so he can chop up his spoils.
When he is blinded by blood, you have an opportunity to rob him: open his bag and steal his silver timepiece.
After that, clean him up using the cloth to finish the level.
Doing the Washing
As a Servant, the tedium never ends.
Grab the dirty clothes below Aldous’ portrait and head into the Servant’s Room.
Pick up the pile of dirty clothes and the baby.
There are more clothes on the table.
Find Kate and give her the baby; collect the diaper.
Check in with William and collect the final piece of dirty clothes.
Head back downstairs and put all the dirty clothes inside the tub on the stove.
Collect the tub with laundry and head to the balcony to hang it; make sure to organise the clothes correctly.
To do this, count the number of red stripes on each piece of laundry.
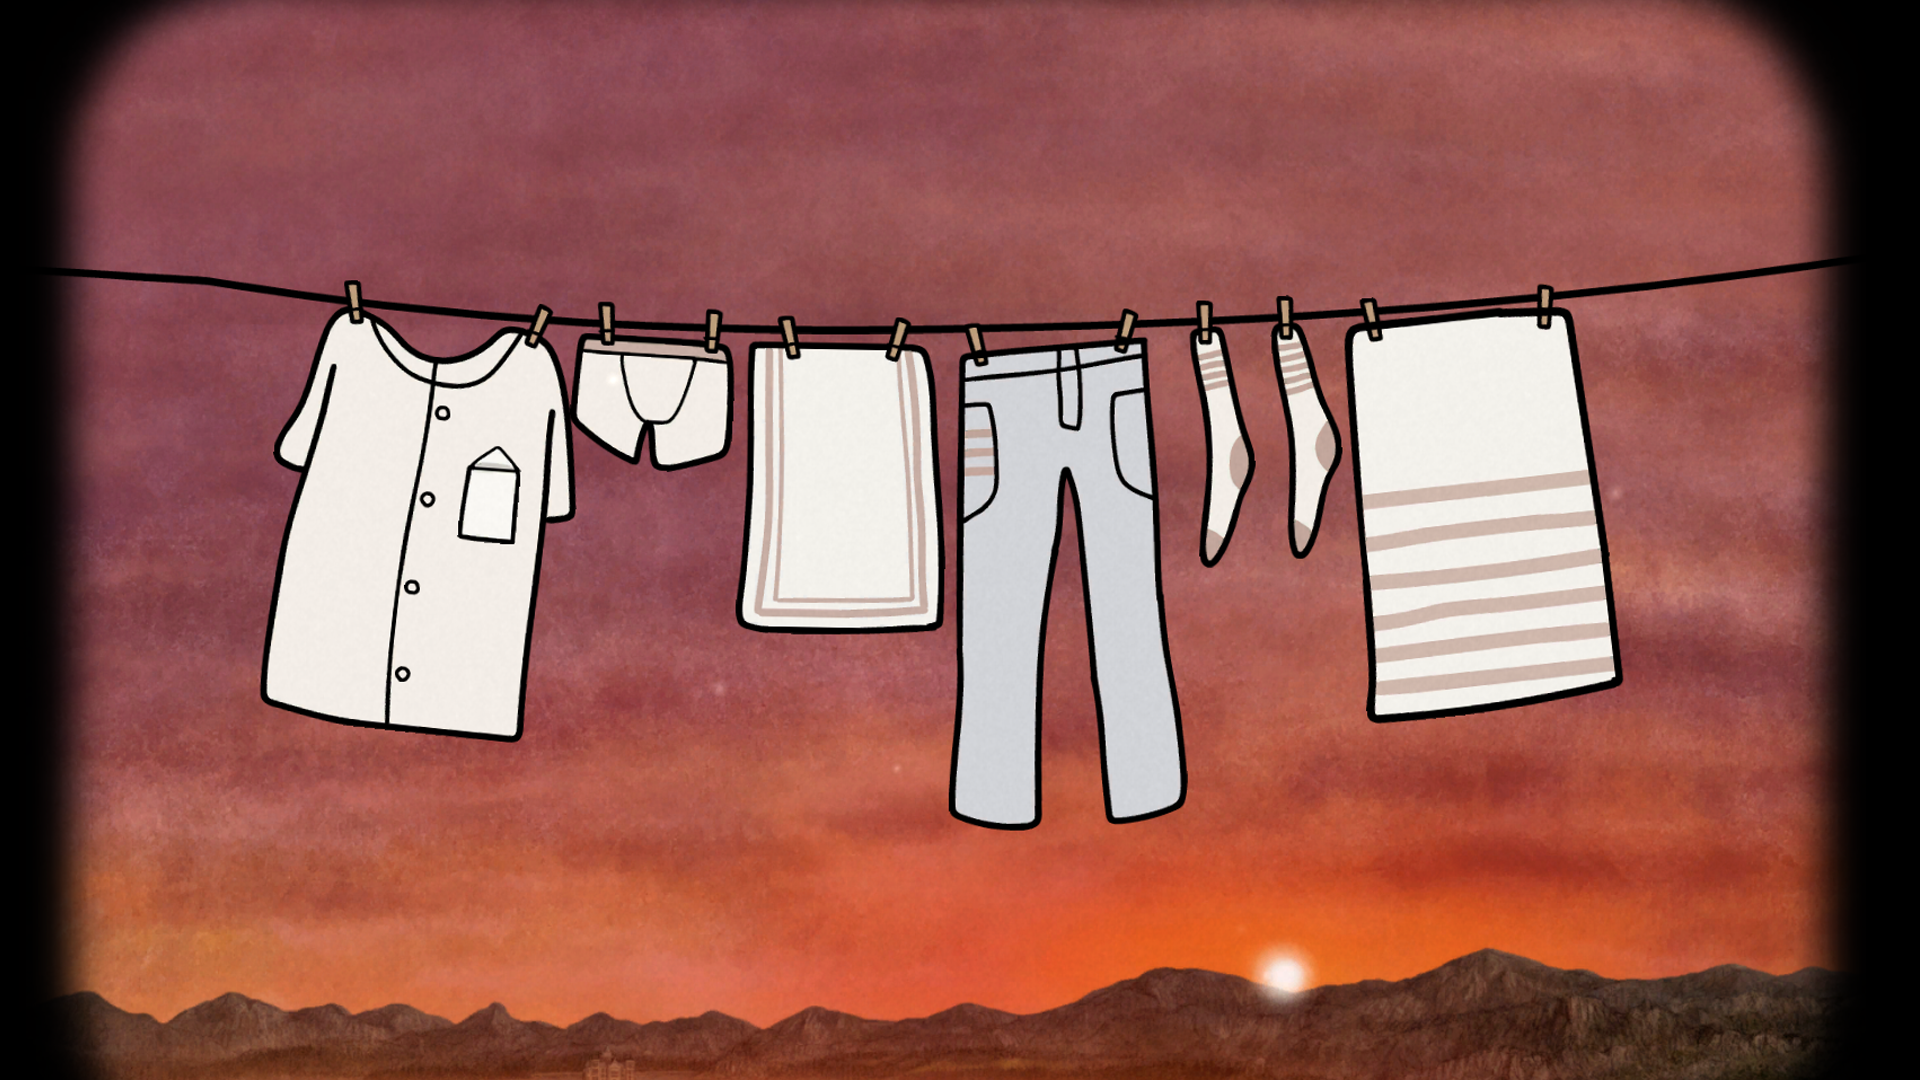
Grab the key from the shirt, unlock the Bathroom and head inside to finish the level.
Helping with Bathing
It’s time for Alexandra’s bath, but first thing’s first.
Check out the tiles behind the bathtub.
To solve the tile puzzle, match sets of four and pay close attention to each theme.
Sets:
Vanderboom family -> William, Alexandra, Aldous and James
Senses -> Eye, Ear, Hand and Nose
Items one might carry -> Gun, Hat, Suitcase and Elixir
Flowers -> Dandelion, Tulip, Larkspur and Lily
Furniture -> Chair, Bath, Table and Side table
Animals -> Rabbit, Cat, Bird and Goat
After matching all the sets, collect the scissors.
Use the tub on the bathtub to fill it, and then unlock the box on the table.
To unlock the box make sure all the squares are in their correct location. Note the shapes on the box and the holes in the squares tip: start with the middle piece.
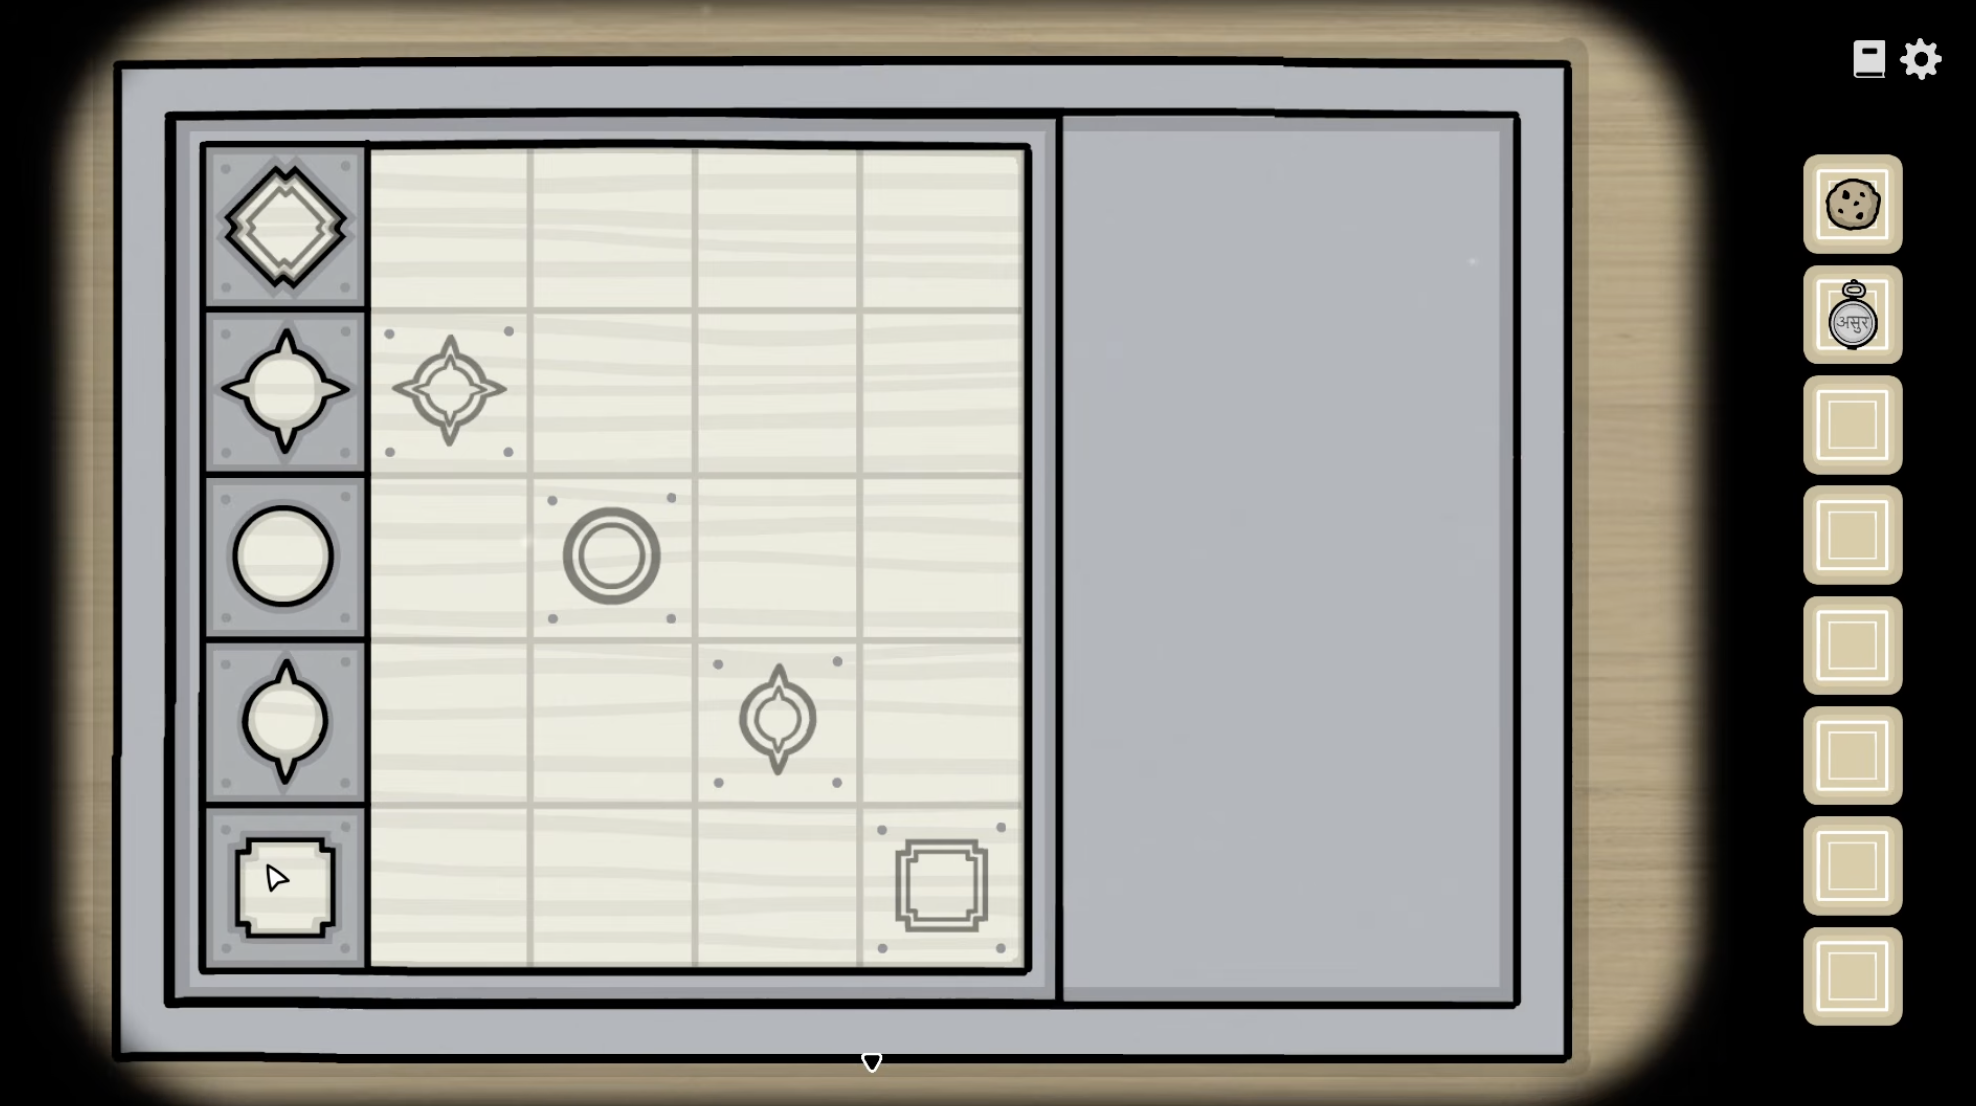
Collect the soap from the box and the cookie from the plate, and add the soap to the bathtub.
Take off Alexandra’s hat and pull out her hairpin.
Use the scissors on her stitches to obtain a maggot.
Put the cookie outside the mouse hole and use the hairpin to kill the mouse, then use the maggot on the mouse to create and obtain the bone comb.
Now comb Alexandra’s hair and help her undress so she can take her bath.
It’s time to help Alexandra relax, to solve the bubble puzzle, and hit the correct bubble so all of them pop.
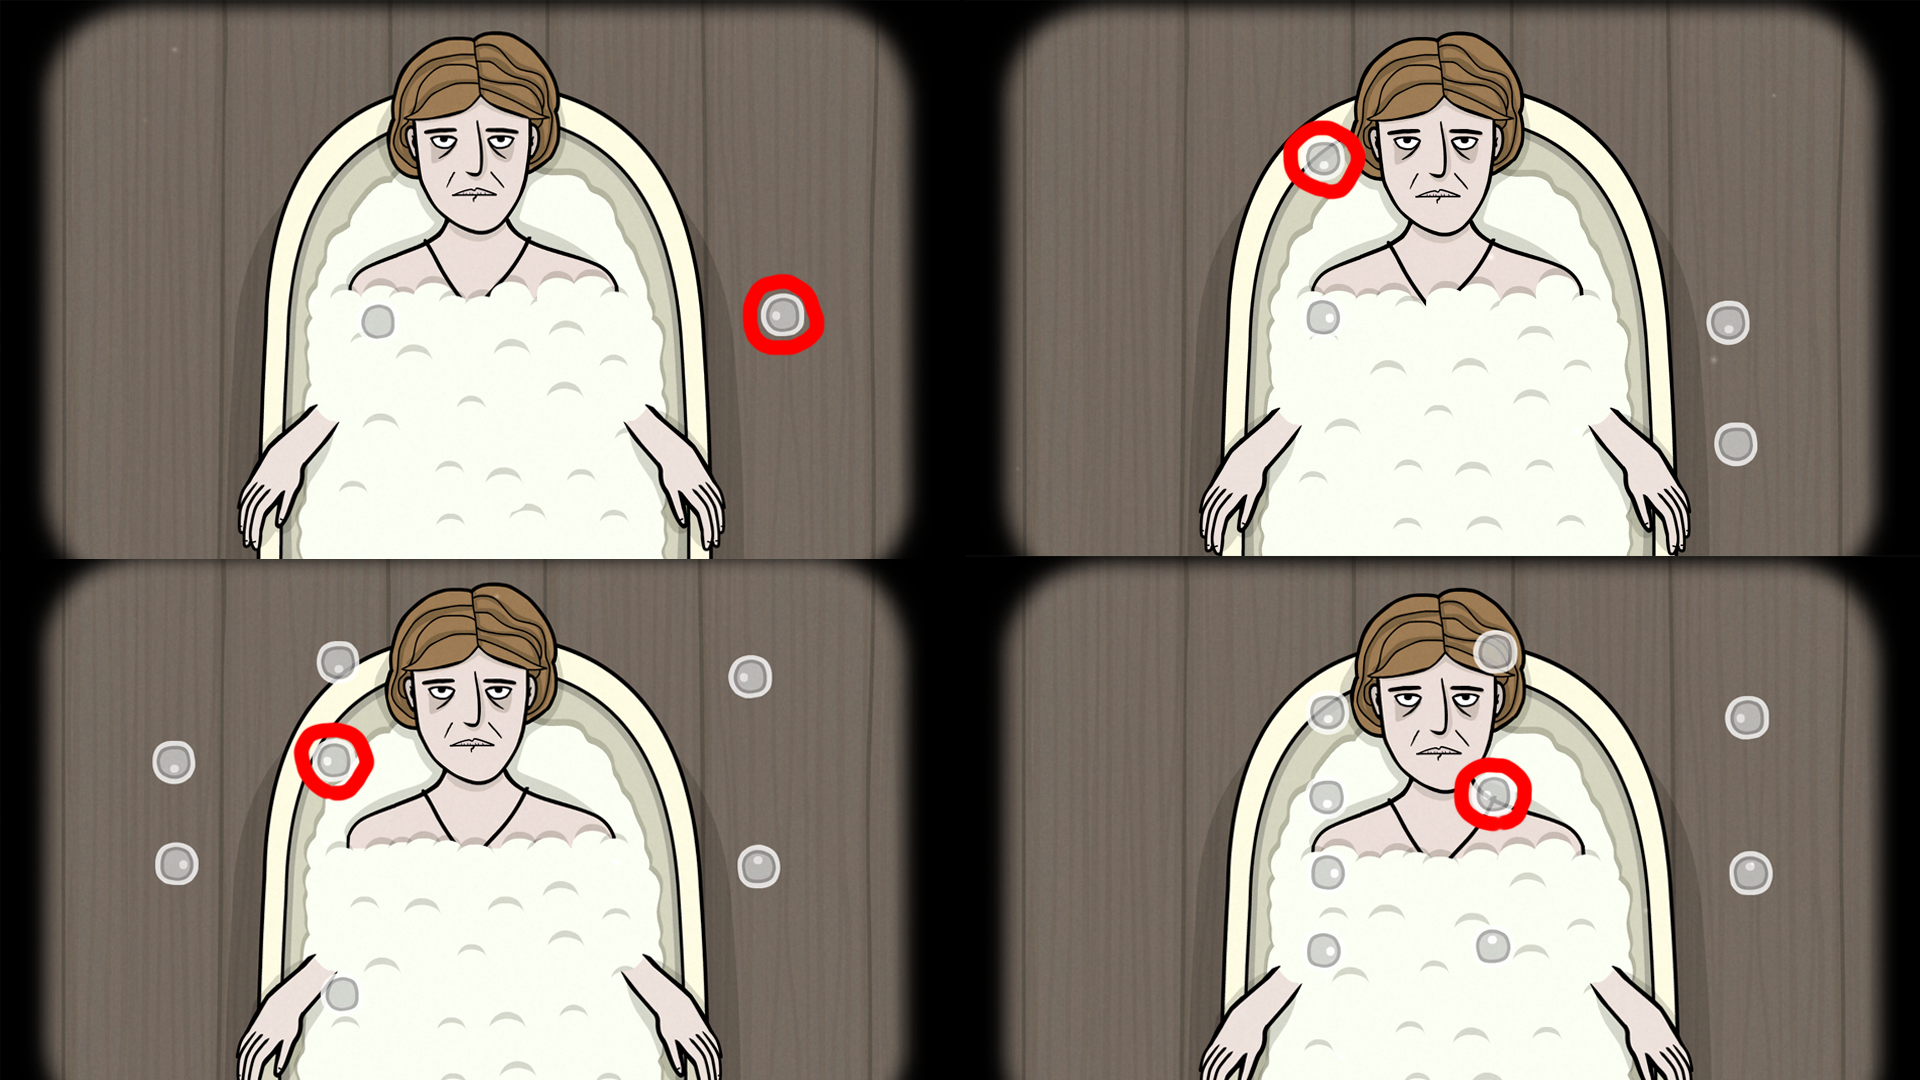
Use the hairpin to defend Alexandra and then use the scissors to steal her pendant.
Alexandra tells you to leave but you’re not quite done yet.
Hang her hat on the coat rack and collect the notes inside her gown and hat; put the notes on the table.
Now you can unlock her suitcase: Figure out the code using the notes on the table.
Solution: 281
Open her suitcase and use the pendant to open the box inside the suitcase. Steal the bronze timepiece and leave to finish the level.
Night Time Duties
You’ve done it! You’ve acquired the other timepieces!
Head into the Servant’s Room, where William will be waiting.
Talk with William until he gives you his golden timepiece.
Now use each timepiece on their owner’s portrait and take a note of the symbols.
Aldous - Silver - Triangle with horizontal line
Alexandra - Bronze - Cross
William - Gold - S
Head down into the cellar and use the symbols you found on the portraits to put the bottles in their correct location.
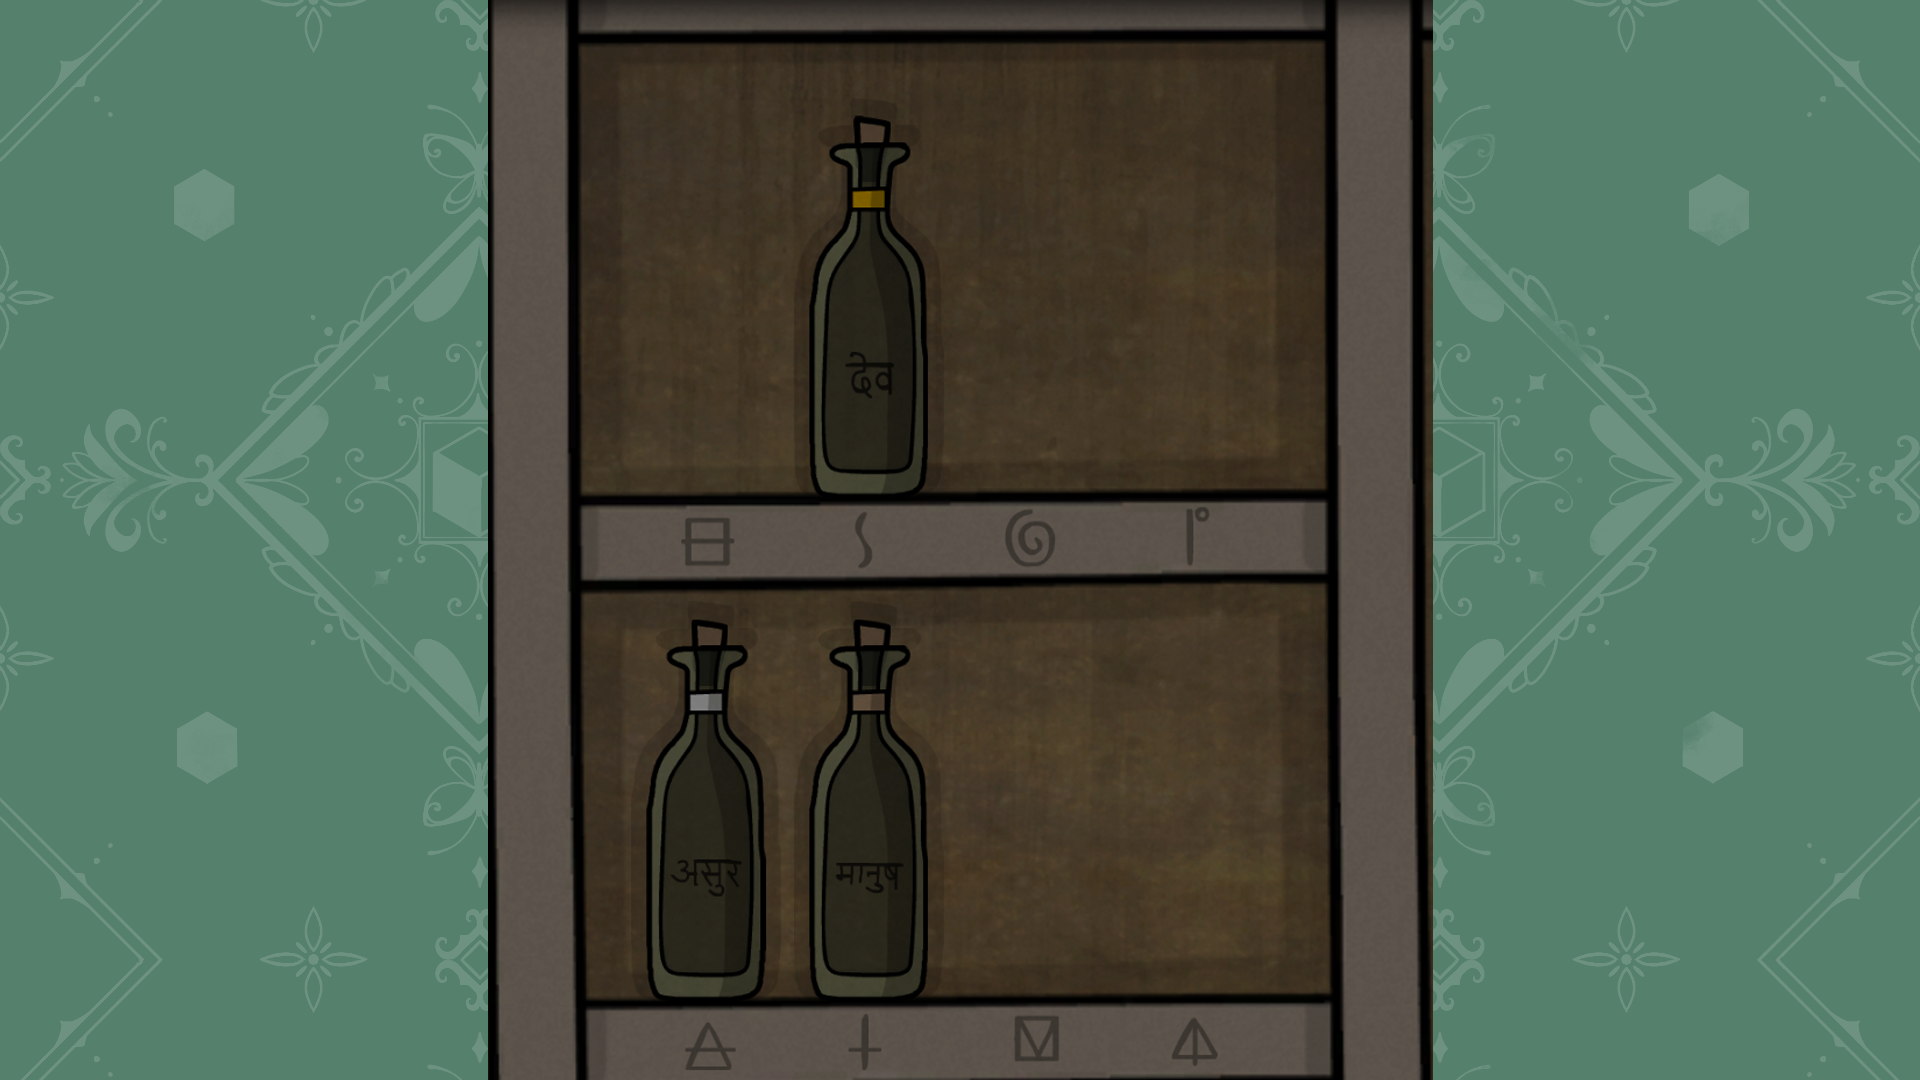
Crawl through the barrel to finish the level.
Inspecting the Cellar
What mysteries await you deep underground?
To solve this level, you will need to use the correct set of tools to solve each of the hallways and find the clock times to open the door at the end.
The correct sets are:
Left hallway - spade, magnet, matches.
Use the magnet on the mouse hole to obtain the key, use the spade on the dirt to dig up a box, open the box with the key to obtain the torch.
Use the torch on the holder and light it to finish this hallway.
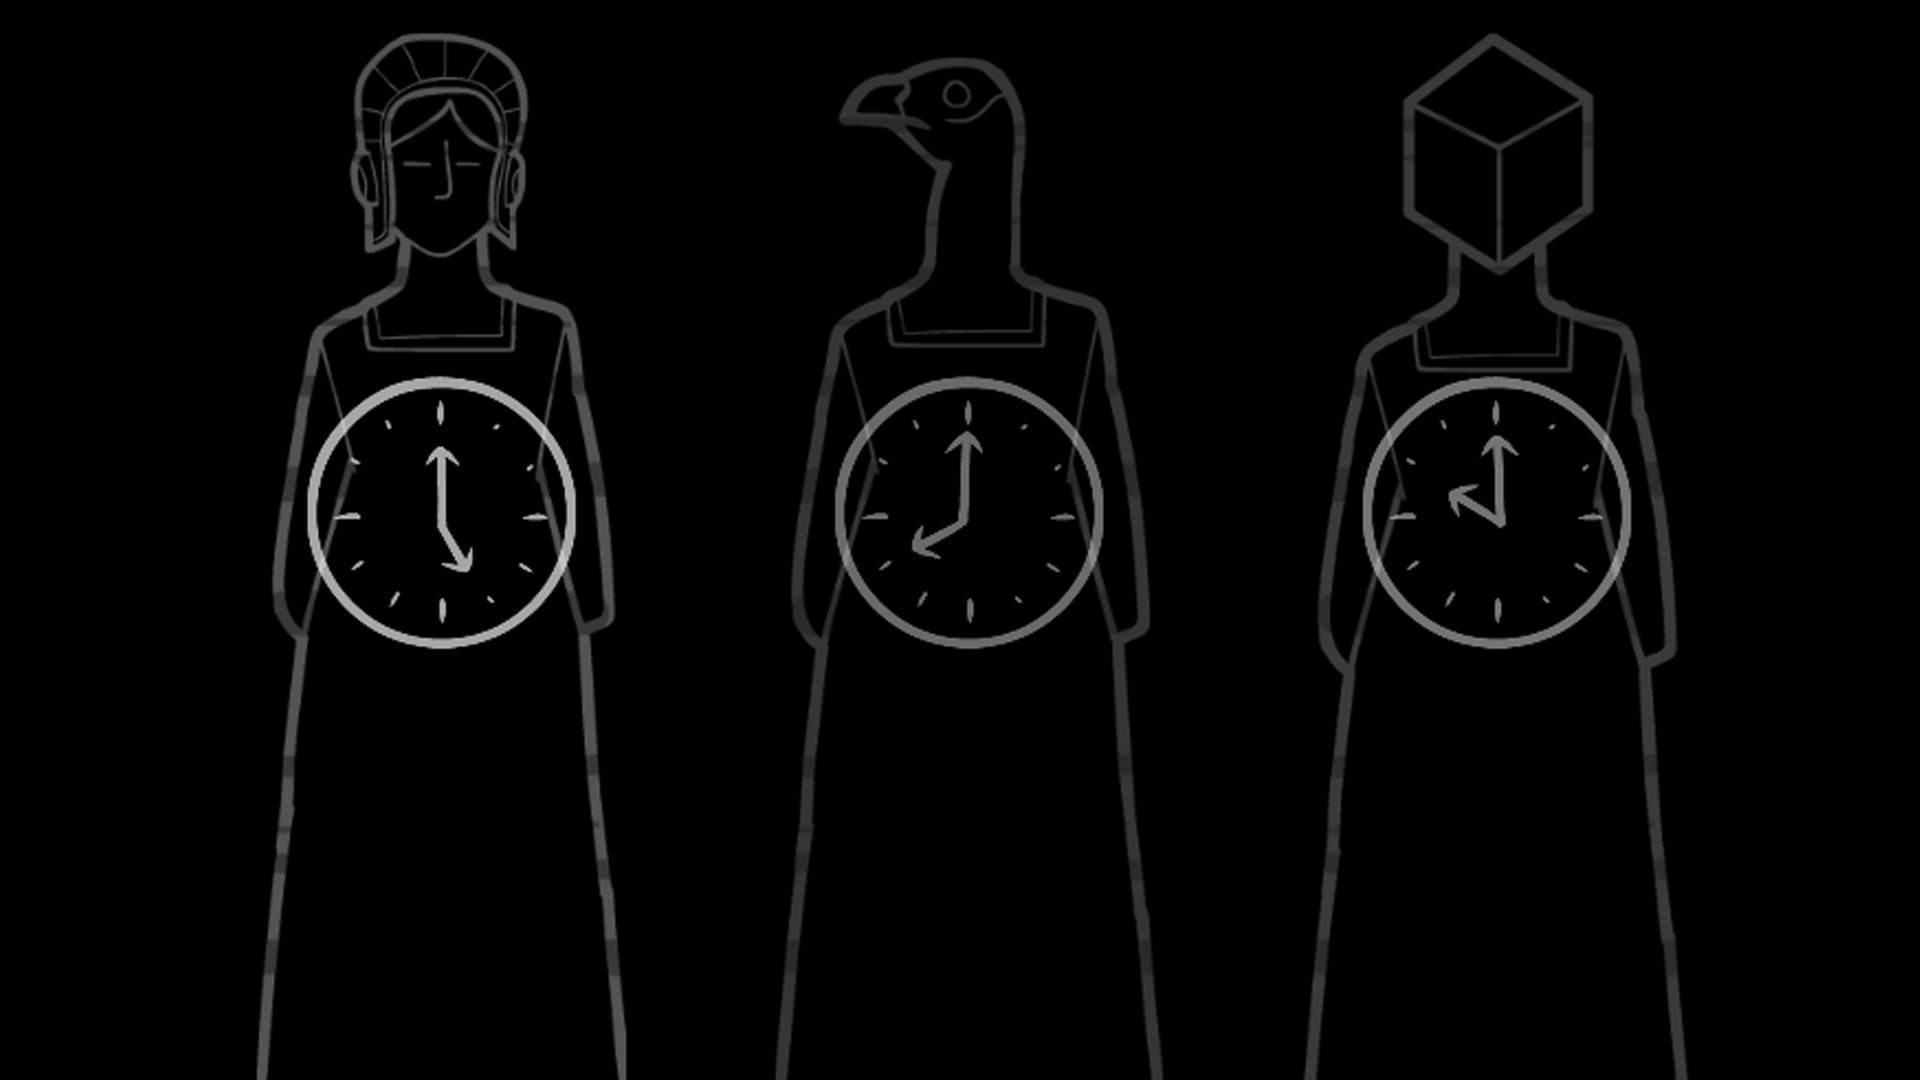
Take note of the time: 8 PM
Middle hallway - corkscrew, bottle, matches
Use the corkscrew on the barrel and fill up the bottle to obtain the bottle with oil.
Light up the oil coming from the barrel using the matches and wait for the barrel to explode.
Drop the oil down the hole in the rock and use the matches once again to create an explosion.
Find the time down the hallway to finish this section.
Take note of the time: 10 PM
If you haven’t yet, make sure to interact with the statue you see before entering a hallway to also collect that time: 5 PM.
Final hallway (right) - weight, sledgehammer, hook
Use the hook on the ring and attach the weight so you can go through the gate.
Destroy the pillar with the sledgehammer and go through until you reach the statues.
To open the door, put a timepiece on each statue and input the times you found earlier.
From left to right:
5 PM
8 PM
10 PM.
Go through the door and collect the book. Hand the book to Aldous to finish the level.
DAY 3
Looking for the Cat
You’re almost there, just one more day.
Talk to Kate until she asks you to find the cat.
You’ll be interrupted by William once you enter the hallways of the house; talk to him next and give him the hammer.
Now find Rustie!
Grab the pebble from Aldous’ bust and toss it a the log outside to find the first hiding spot.
Now find the cat in the following locations:
Under the chair
Behind Aldous’ bust
In the stove (only after eavesdropping on William making a ruckus).
Talk to Kate again until she tells you to read the note on the table.
Next up,, open the secret entrance to the alchemy level.
To do this click the correct items on the painting next to Aldous’ bust; use the note as a guide.
Solution: hat > rifle > bear > crow.
Crawl through the hole to finish the level.
Assisting in Alchemy
It’s time to help Aldous further his Elixir research!
To finish this level, your goal is to figure out the meaning of all the symbols on the board and then create the Elixir.
But talk to Aldous first and make sure to collect the water and bottle from the crate.
To sort the symbols on the board, pay close attention to the clues throughout the room. The board is divided in, three sections: Numbers, Directions and Liquids, each section has its own identifiers too.
Numbers:
1 -> Already filled in
2 -> Look at the painting holding up two fingers
3 -> Final number tile left (each number tile only has one dot)
4 -> Look at the painting with the windows
5 -> Look at the painting with the windows; count the number of times you water the parrot
Directions:
Heat -> Light the candle using the matches
Aldous -> Look at the painting with the three siblings
Left -> Can be figured out by looking at the locked box on the floor
Right -> Can be figured out by looking at the locked box on the floor
Middle -> Look at the painting with the three siblings
Liquids:
Water -> Look at the painting depicting water
Oil -> Use the distillation setup in the back of the lab
Blood -> Look at the grinder
Juice -> Look at the grinder
Acid -> Use the distillation setup in the back of the lab
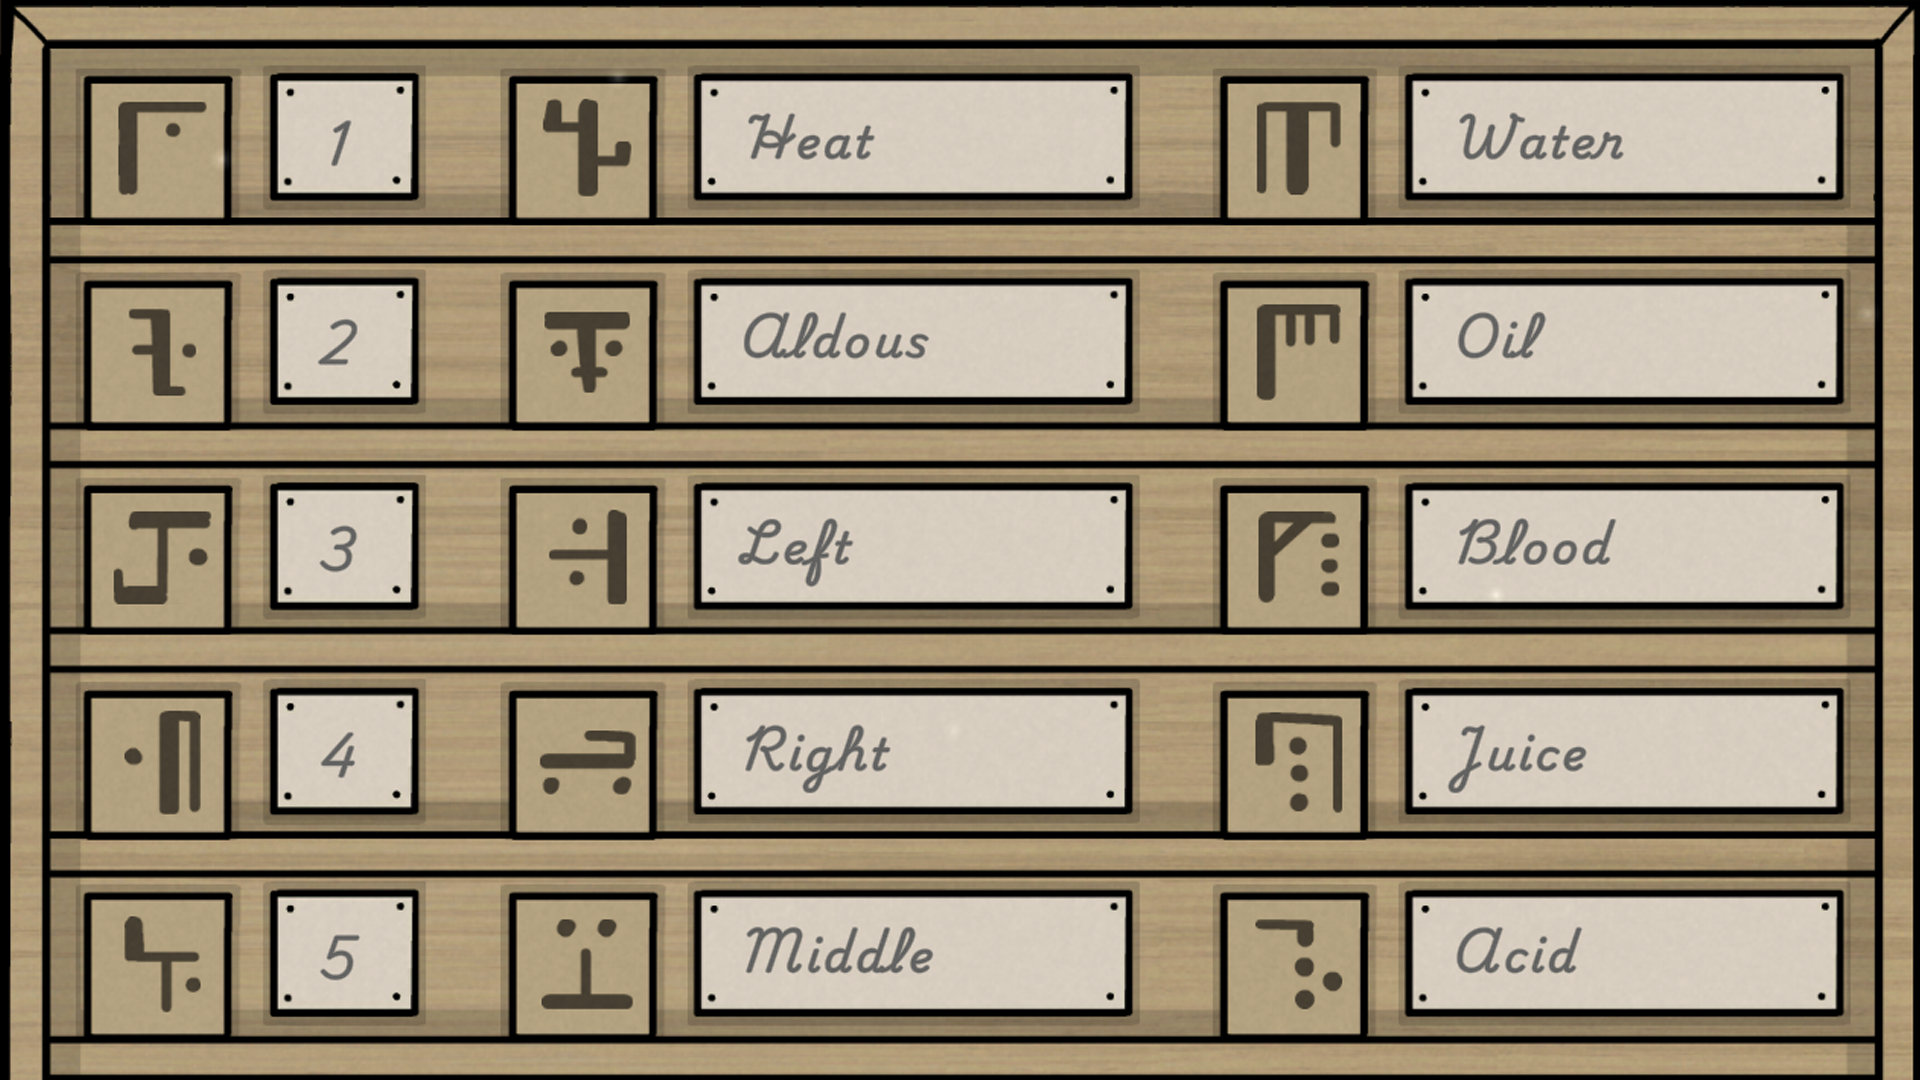
Puzzle solutions in the room:
All the puzzles in the room can be solved by decoding the symbols in the room.
Obtaining matches -> open the locked box: Left, Left, Right, Right, Left, Right
Obtaining bottles -> open the locked cupboard: 2451
Obtaining oil -> using the distillation setup in the back: 2x left, 3x middle.
Obtaining acid -> using the distillation setup in the back: 4x right, 1x left
Obtaining blood -> give Aldous acid to obtain the meat and grind the meat in the grinder (hit the lever 4 times)
Obtaining juice -> water the plant with water 4 times and with blood once to obtain the strange fruit; grind the fruit in the grinder (hit the lever 4 times)
Obtaining the egg -> give the parrot water 5 times
After obtaining all the liquids, the egg, and your heat source, you can make the elixir.
To do this, decipher the recipe in the book.
The recipe is as follows:
Add egg
Add 1x juice
Add 1x acid
Add 1x oil
Add 3x blood
Collect the elixir and give it to Aldous to finish the level.
Unforeseen Maintenance
William is displeased and took it out on the house, get it back into order before the closing dinner.
Head into the Servant’s Room and check in with Rustie to obtain the sticky substance.
Also collect the statue head from the stove.
In the hallways, collect the part of chair on the red chair, the part of chair on the entrance table, the stove cover in front of the broken statue and the balcony piece in front of the Dining Room.
Use the sticky substance to repair all the paintings, repair the chair using the chair parts, and attach the statue head.
Place the balcony piece in its correct spot under William’s painting and reattach the stove cover.
After everything is repaired, talk to Kate and head to the Kitchen to finish the level.
Preparing Dinner
Time to prepare a delicious meal!
Talk to Kate until she gives you a knife.
And why not have dessert as a first course?
Start by solving the cake puzzle behind Kate.
To solve this puzzle, make sure the toppings cover each hole on the cake.
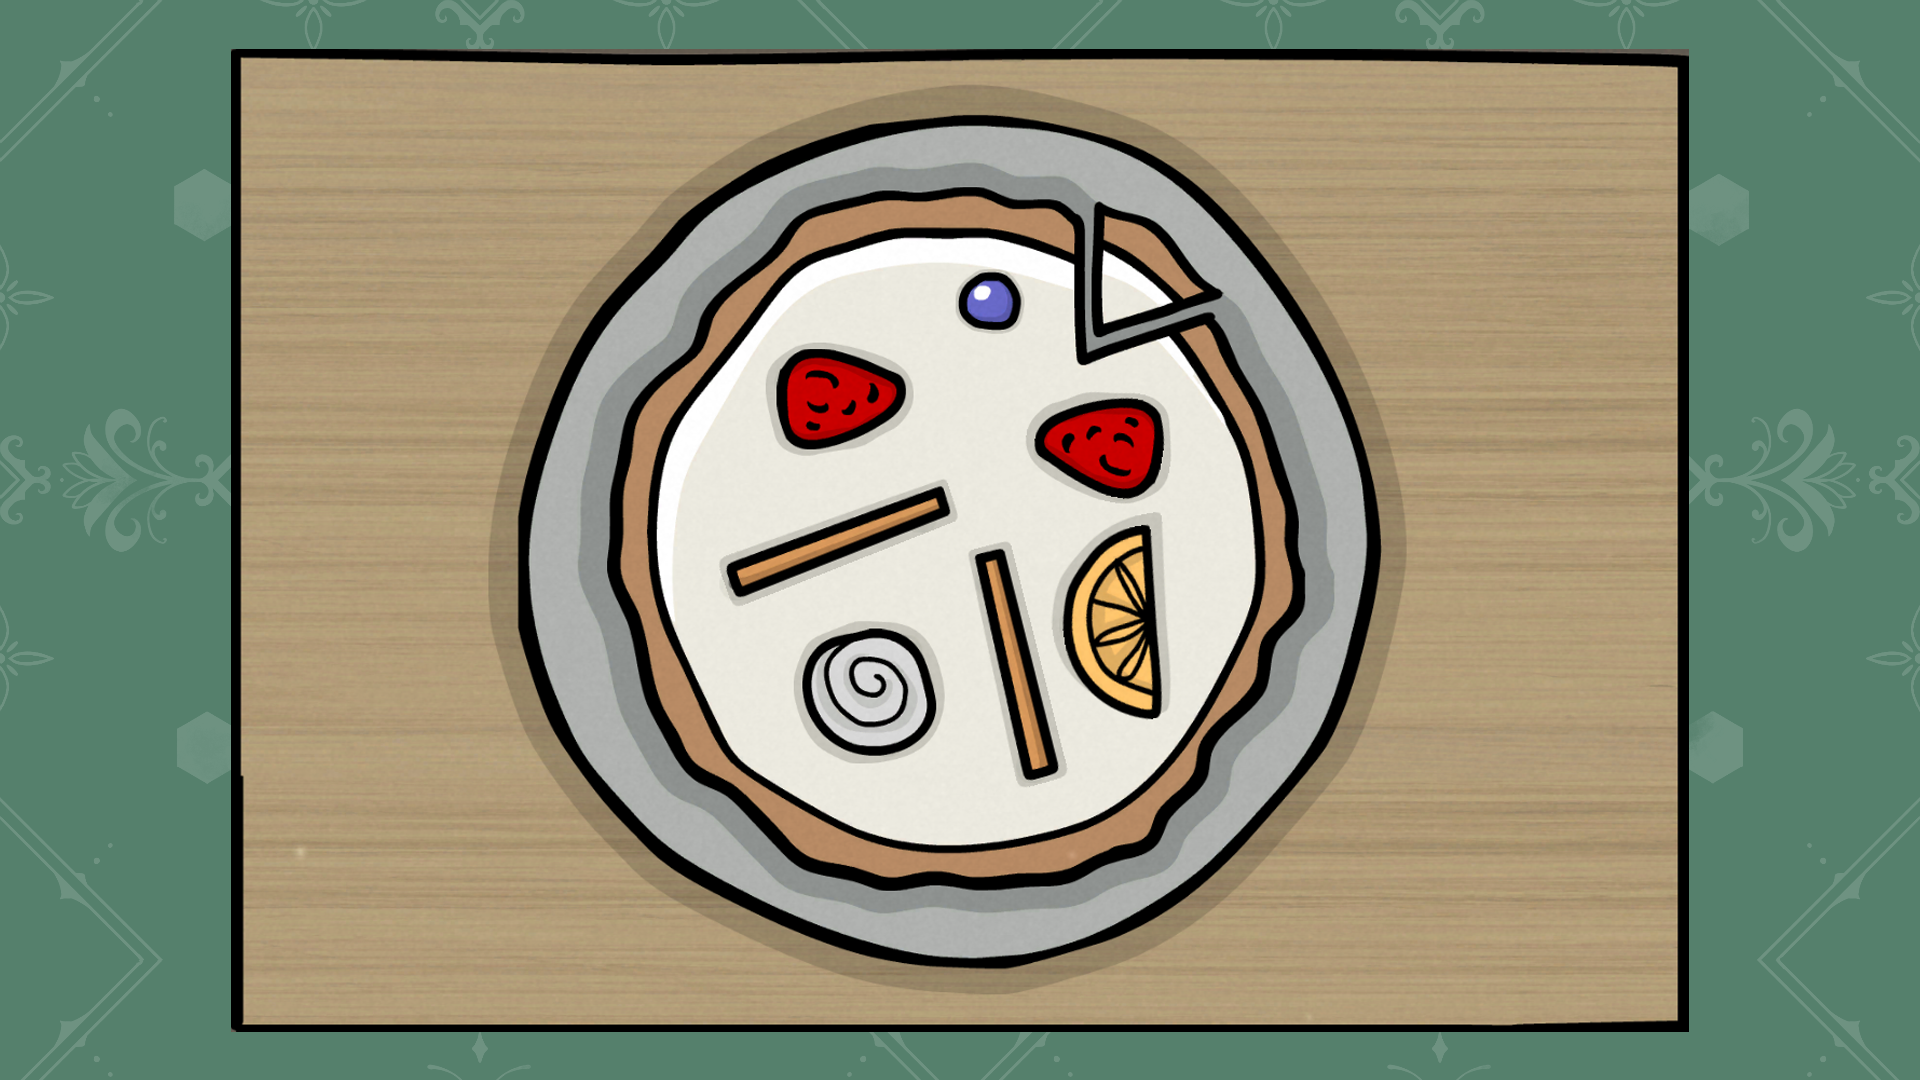
Collect the piece of cake.
Grab the wood from the floor and the onion, potatoes and shrimp from the cupboard.
Talk to William at the window until he gives you a mushroom.
From the oil pantry, collect the tomato and solve the oil puzzle.
To solve the oil puzzle, sort every bottle so that it only contains a single colour.
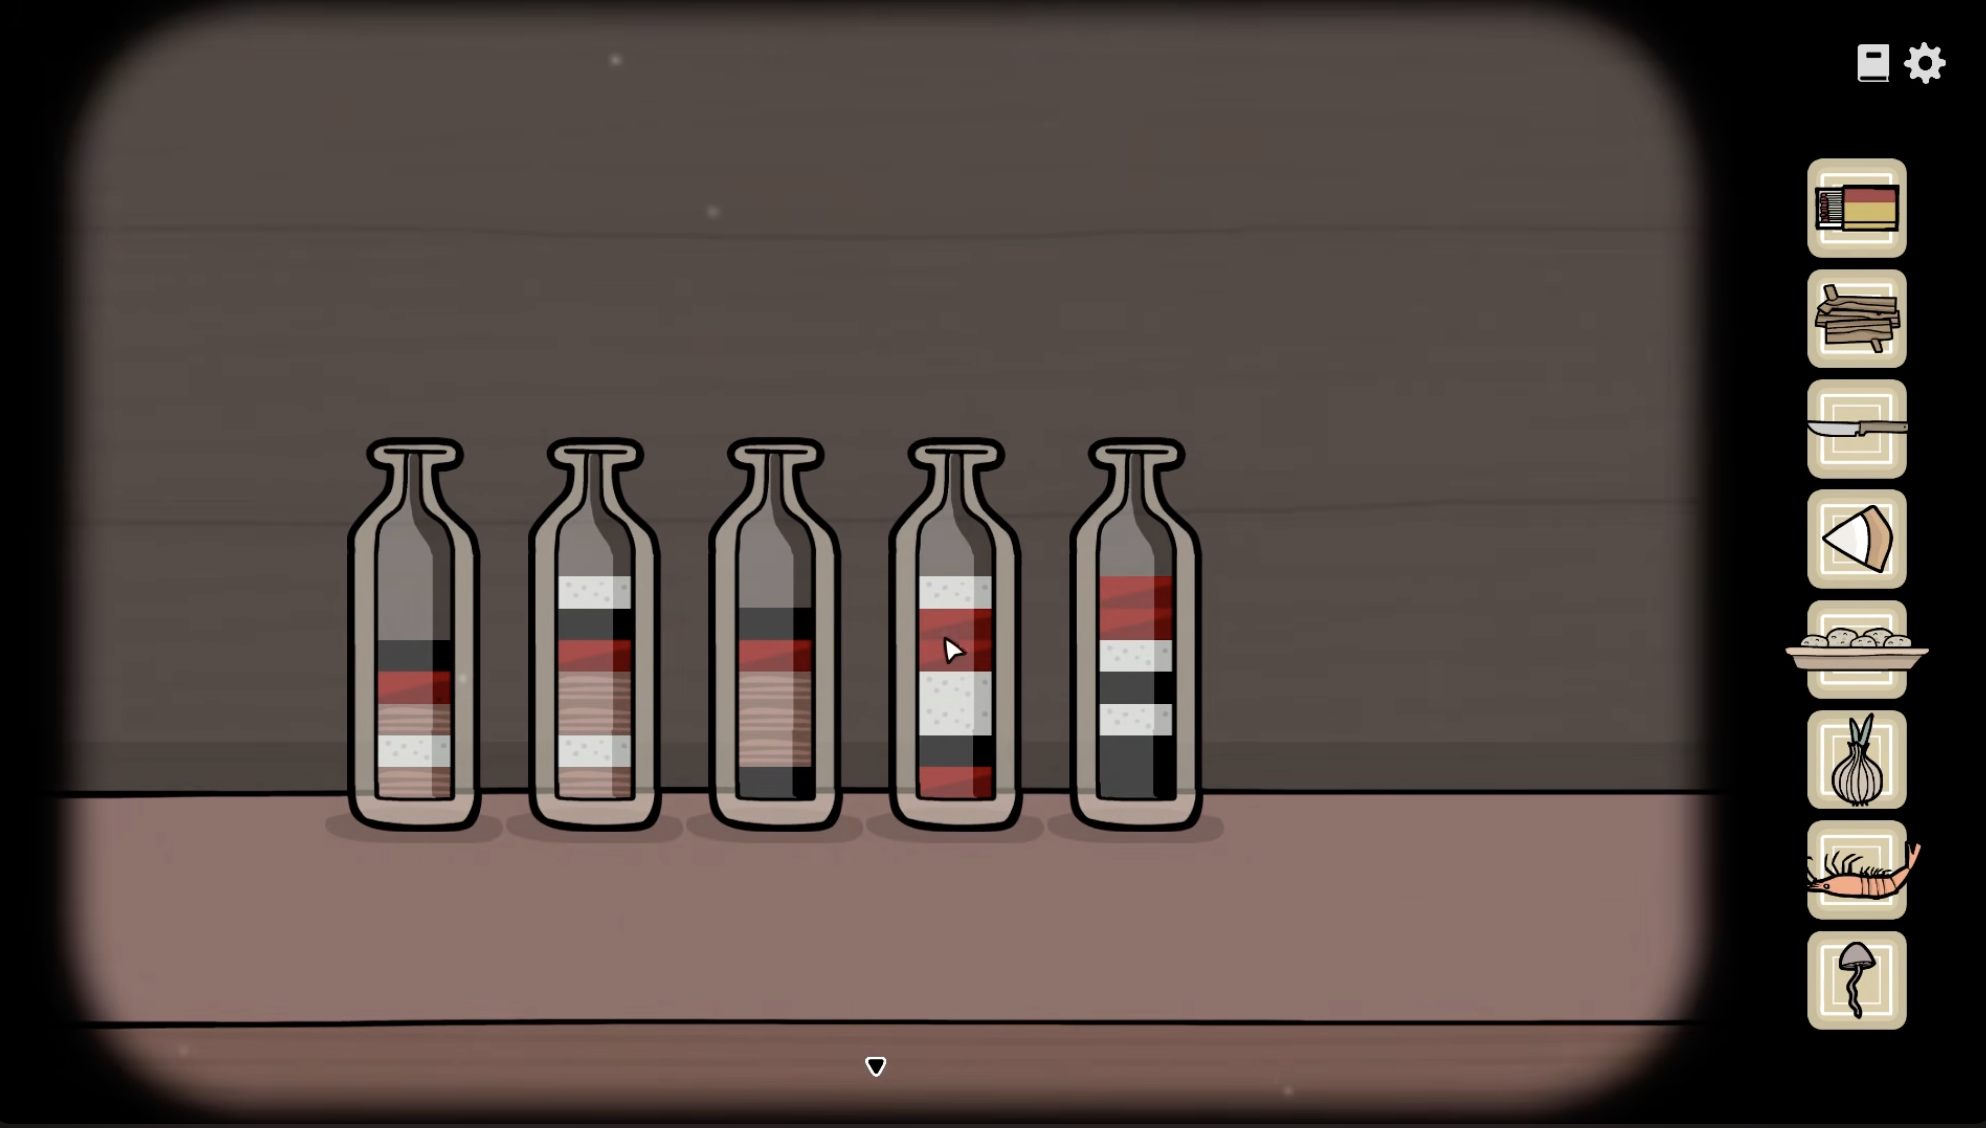
Collect the bottle with oil.
Cut the shrimp, tomato, and onion on the cutting board using the knife.
Fire up the stove using the wood and matches; place the potatoes inside.
Now add your onions, shrimp, mushroom, and oil to the pan on top of the stove.
Grab the baked potatoes and talk to Kate again.
When Aldous arrives, give him the potatoes.
To solve the potato puzzle, match the deformity on Aldous’ face with the correct potato shape.
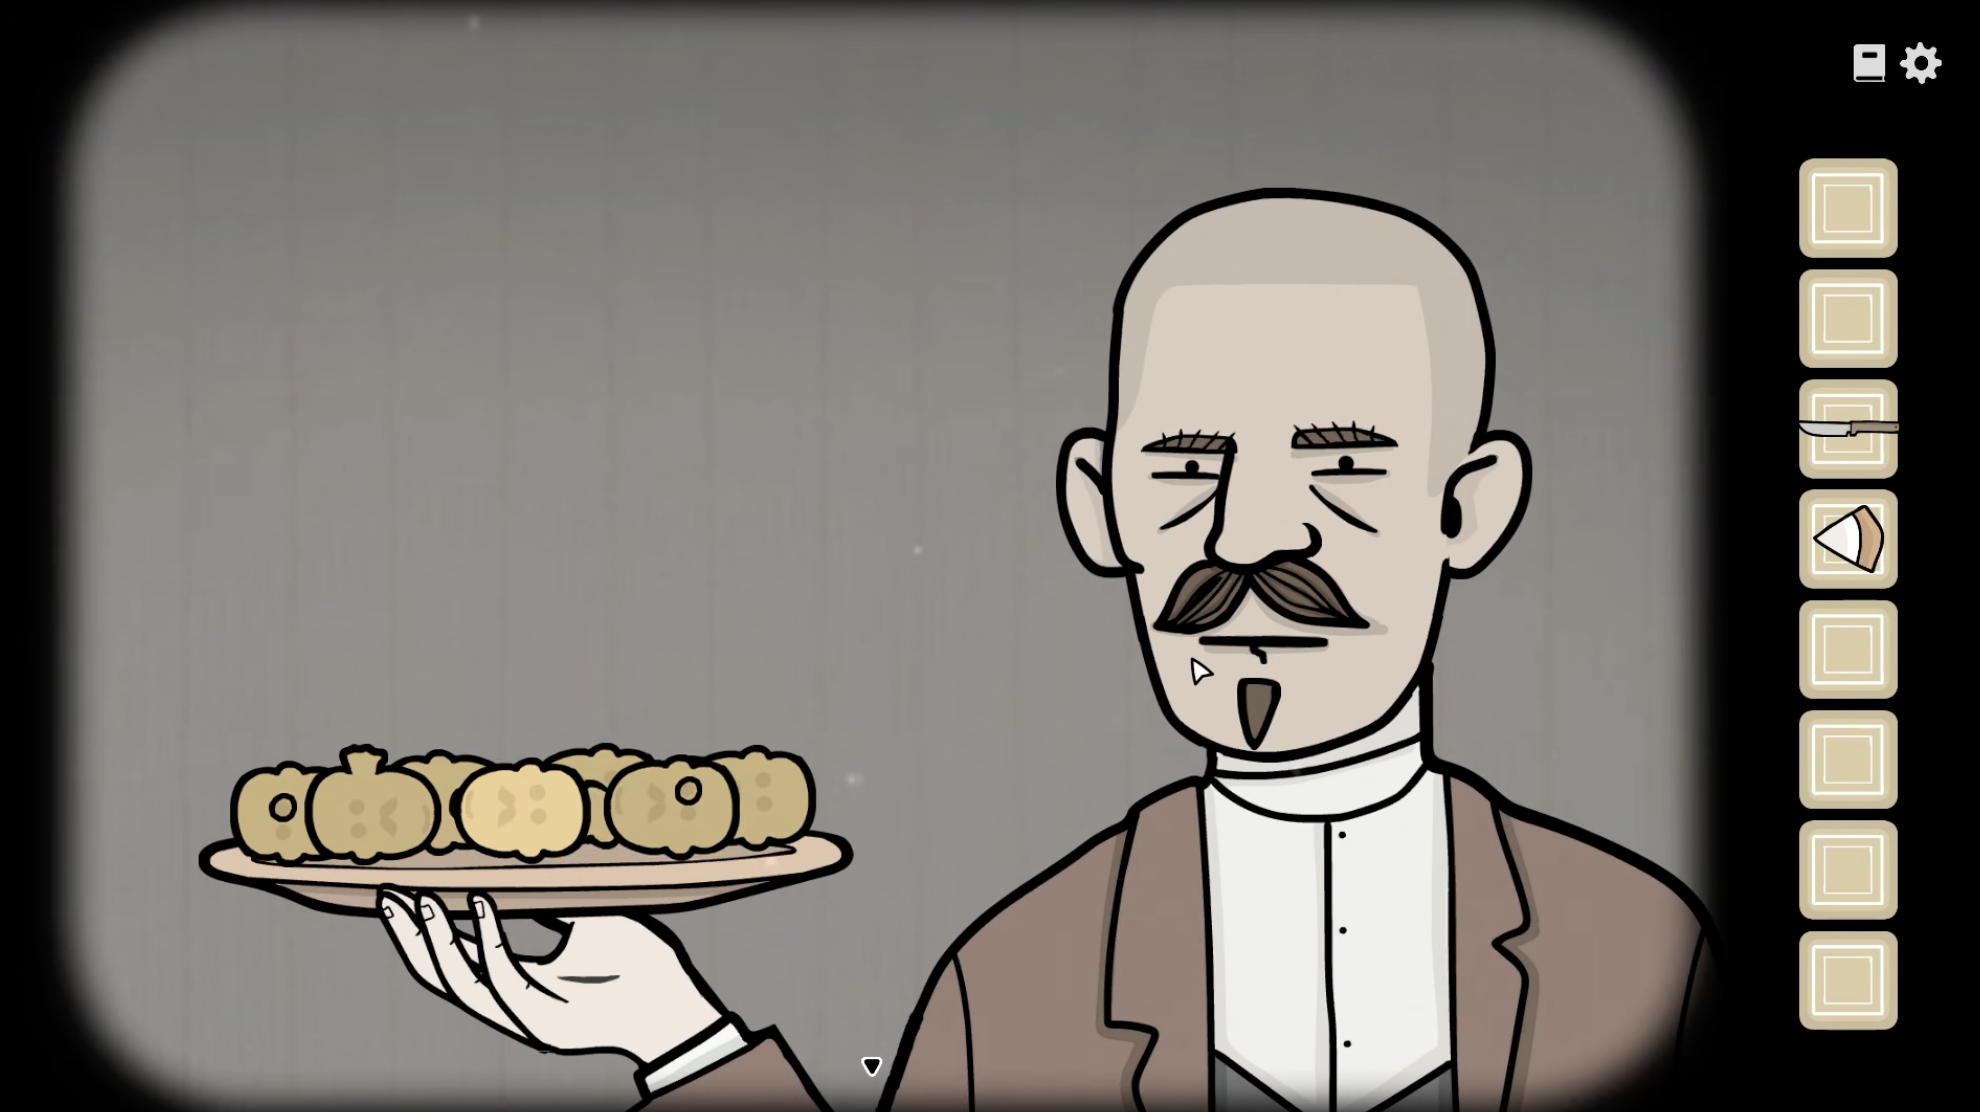
After the potatoes give Aldous the cake, he’ll give you a spoon.
Use the spoon to collect some soup and give it to Aldous.
To solve the soup puzzle, find the correct thing to interact with. Pay close attention to the voice lines.
Solution: William (interact with Hat, Coffee, Bottle, Book) -> Alexandra -> Carriage -> The Moon -> Basket -> Aldous -> Kate.
Talk to Aldous to finish the level.
Dressing up for Dinner
What a trip. It is almost time.
Grab the glass from the table below Aldous’ portrait.
You’ll also find a tie on the red chair; take it with you.
Head down into the basement to collect another glass and open the box on the floor.
Like before, open this box by correctly rotating the squares to form the correct shape.
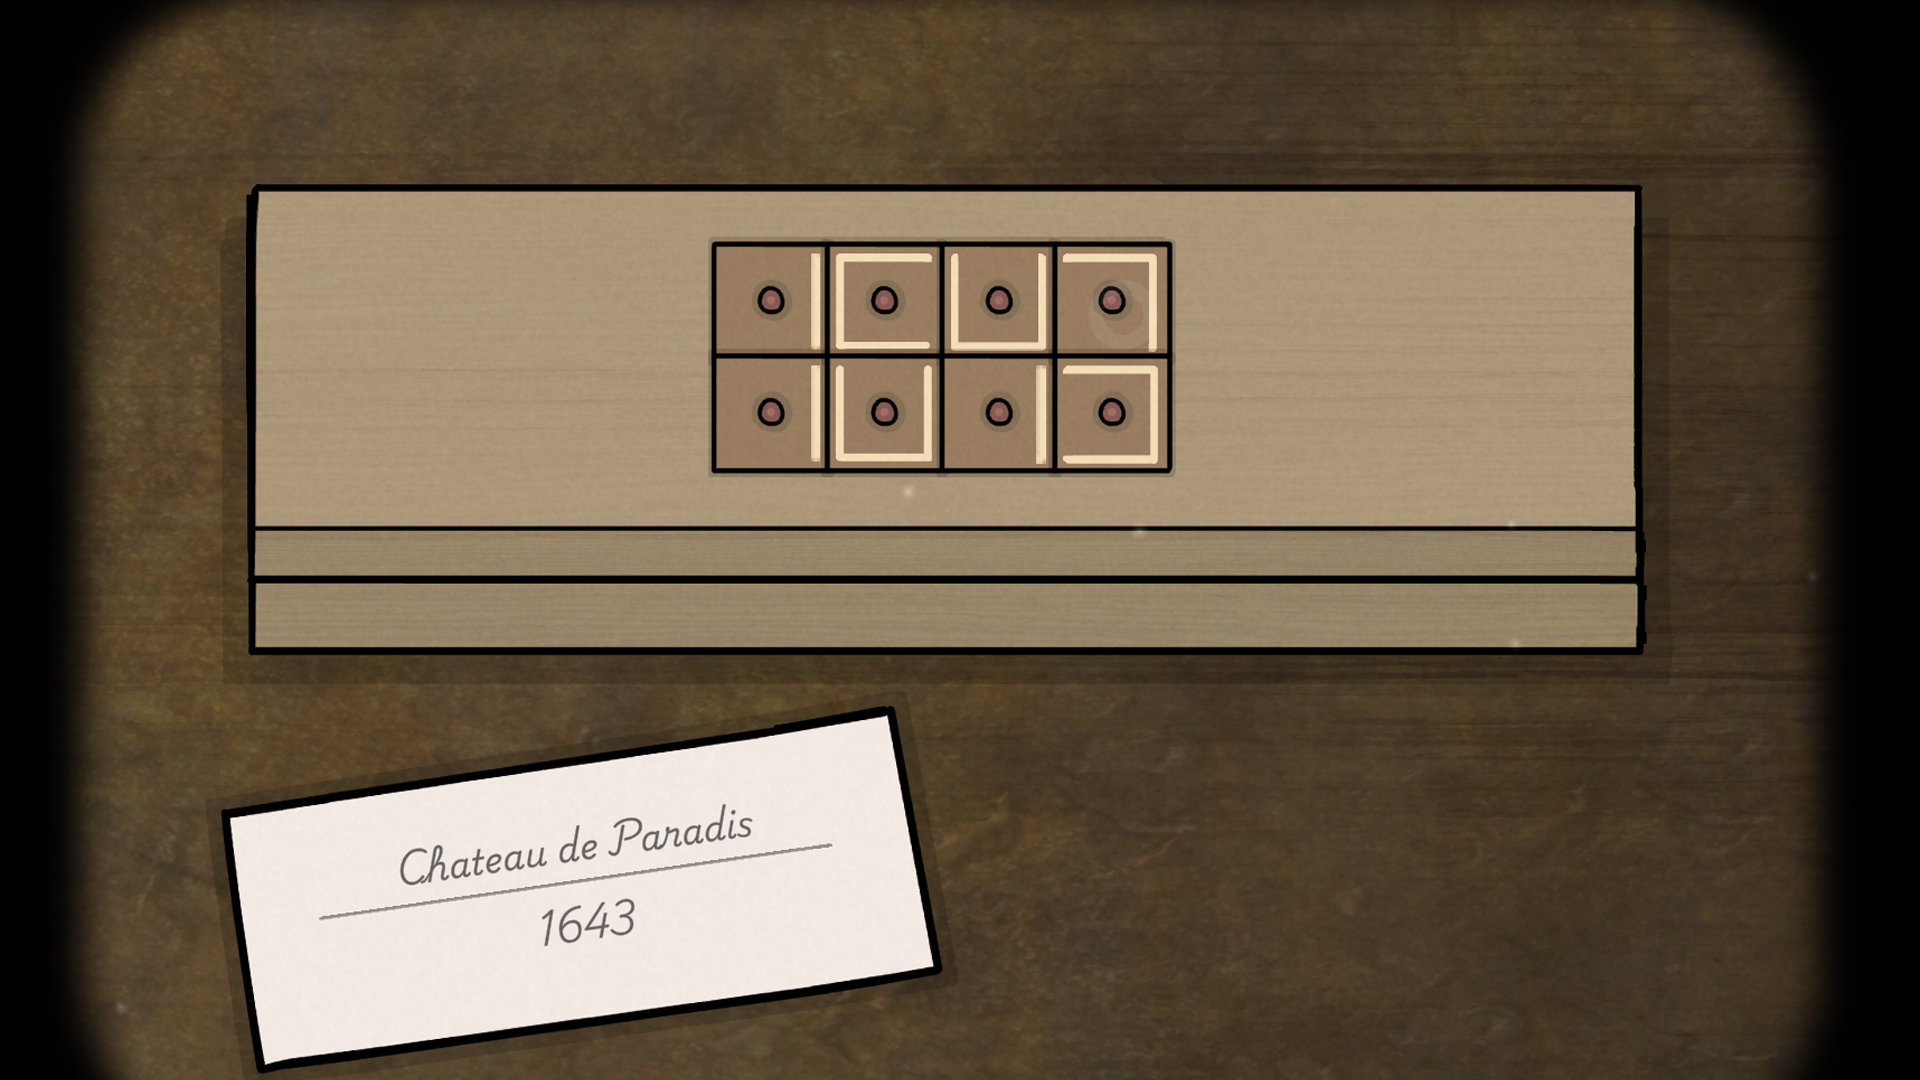
From the box, collect the bottle of wine.
Hand the bottle and the two glasses to Kate and look for the siblings.
From the box on the table upstairs, grab the necklace; from the crate in the downstairs hallway, grab the hairband.
Find Aldous in front of his room and talk to him.
He’ll give you specific instructions:
Tap the hat twice
Listen to the crow
Grab the rifle.
Use these instructions on the painting next to his statue to obtain the rifle; don’t forget to grab his butterfly tie from the statue while you’re there.
Go back to Aldous and give him his tie and rifle.
Head upstairs and talk to William, who is waiting in his room.
Give him his tie and listen to what he has to say.
Go to the fifth step from the bottom of the staircase to find his revolver, go back and give it to him.
Last but not least, talk with Alexandra. She’ll ask you to prepare James.
To do this you have to find the items hidden in the basement.
Firstly, you must put the portraits of the house back into their right place.
Do this by adjusting their locations on the house painting upstairs.
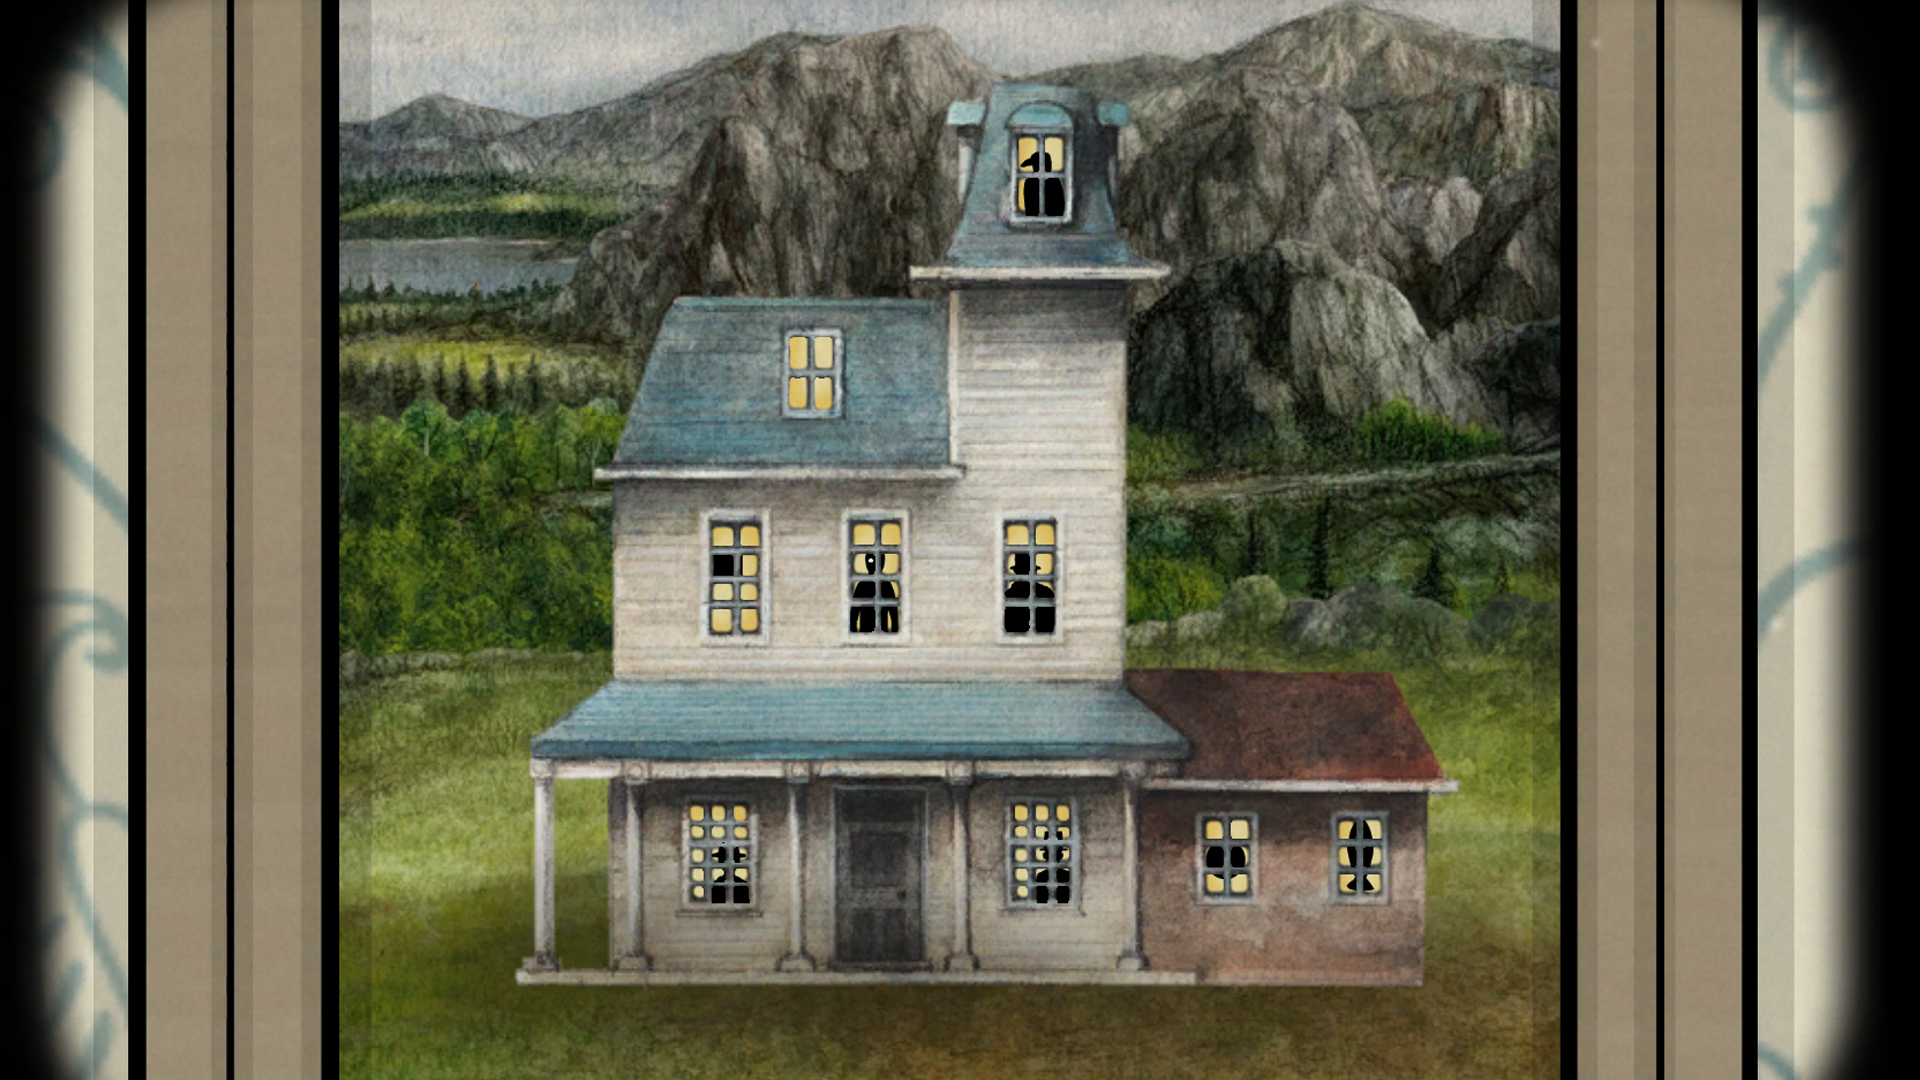
Then put the bottles in the cellar on their correct spots.
You can find their spots by looking at the portraits, taking note of the symbol and timepiece colour.
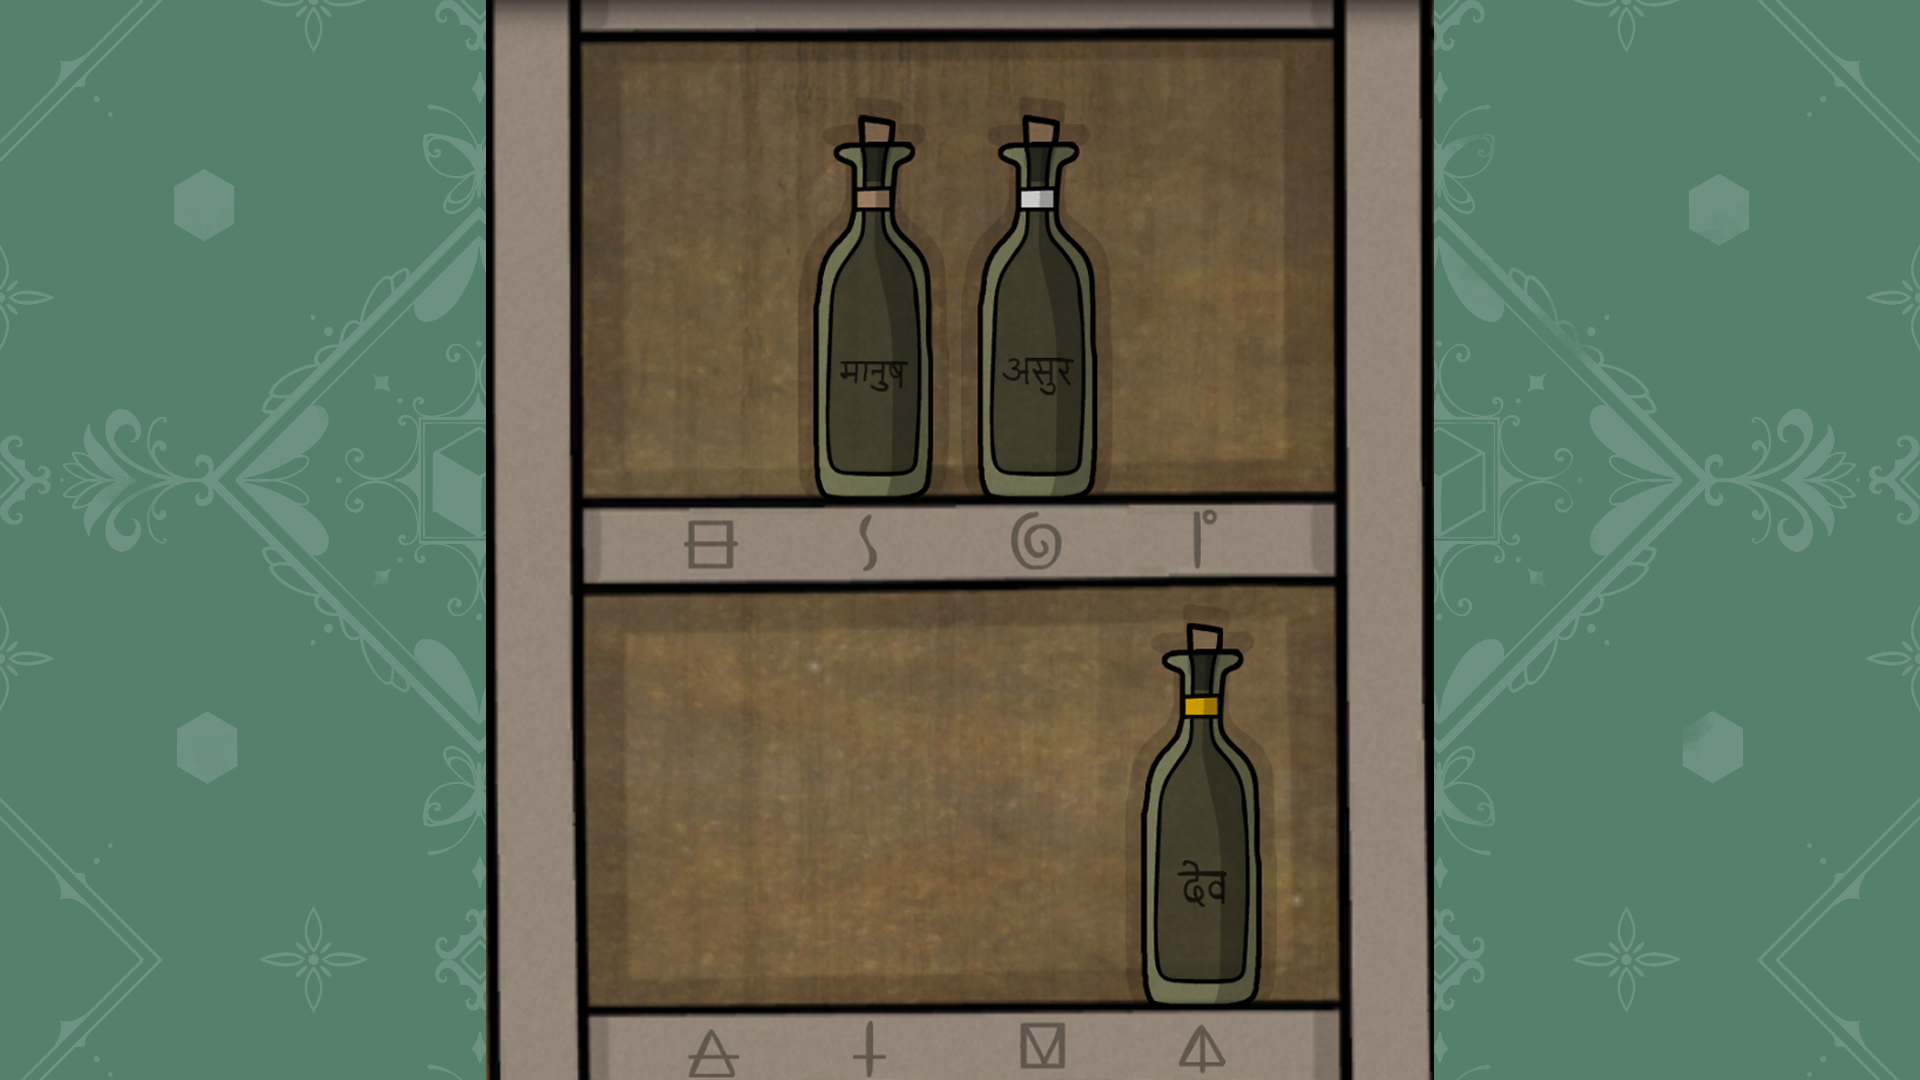
Open the golden chest that pops out of the barrel to find the sacred cloth and sacred water.
Place James in the wicker basket and use the cloth and water on him to prepare him, then talk to Alexandra again.
Give Alexandra her necklace and hair ribbon.
Head to the Dining Room to finish the level.
Then put the bottles in the cellar in their correct spots.
You can find their spots by looking at the portraits, taking note of the symbol and timepiece color.
Serving Dinner
The big conclusion of the reunion!
Grab the red wine from the table, fill everyone’s glass and talk to Aldous to start the dinner.
Collect the plate with appetisers from Kate and put them on the table.
Make sure each sibling gets the correct appetisers; follow the instructions on the note to figure out how.
Solution:
Aldous - onion ring, broccoli
Alexandra - rabbit ear, pâté on toast
William - slice of bacon, fish head
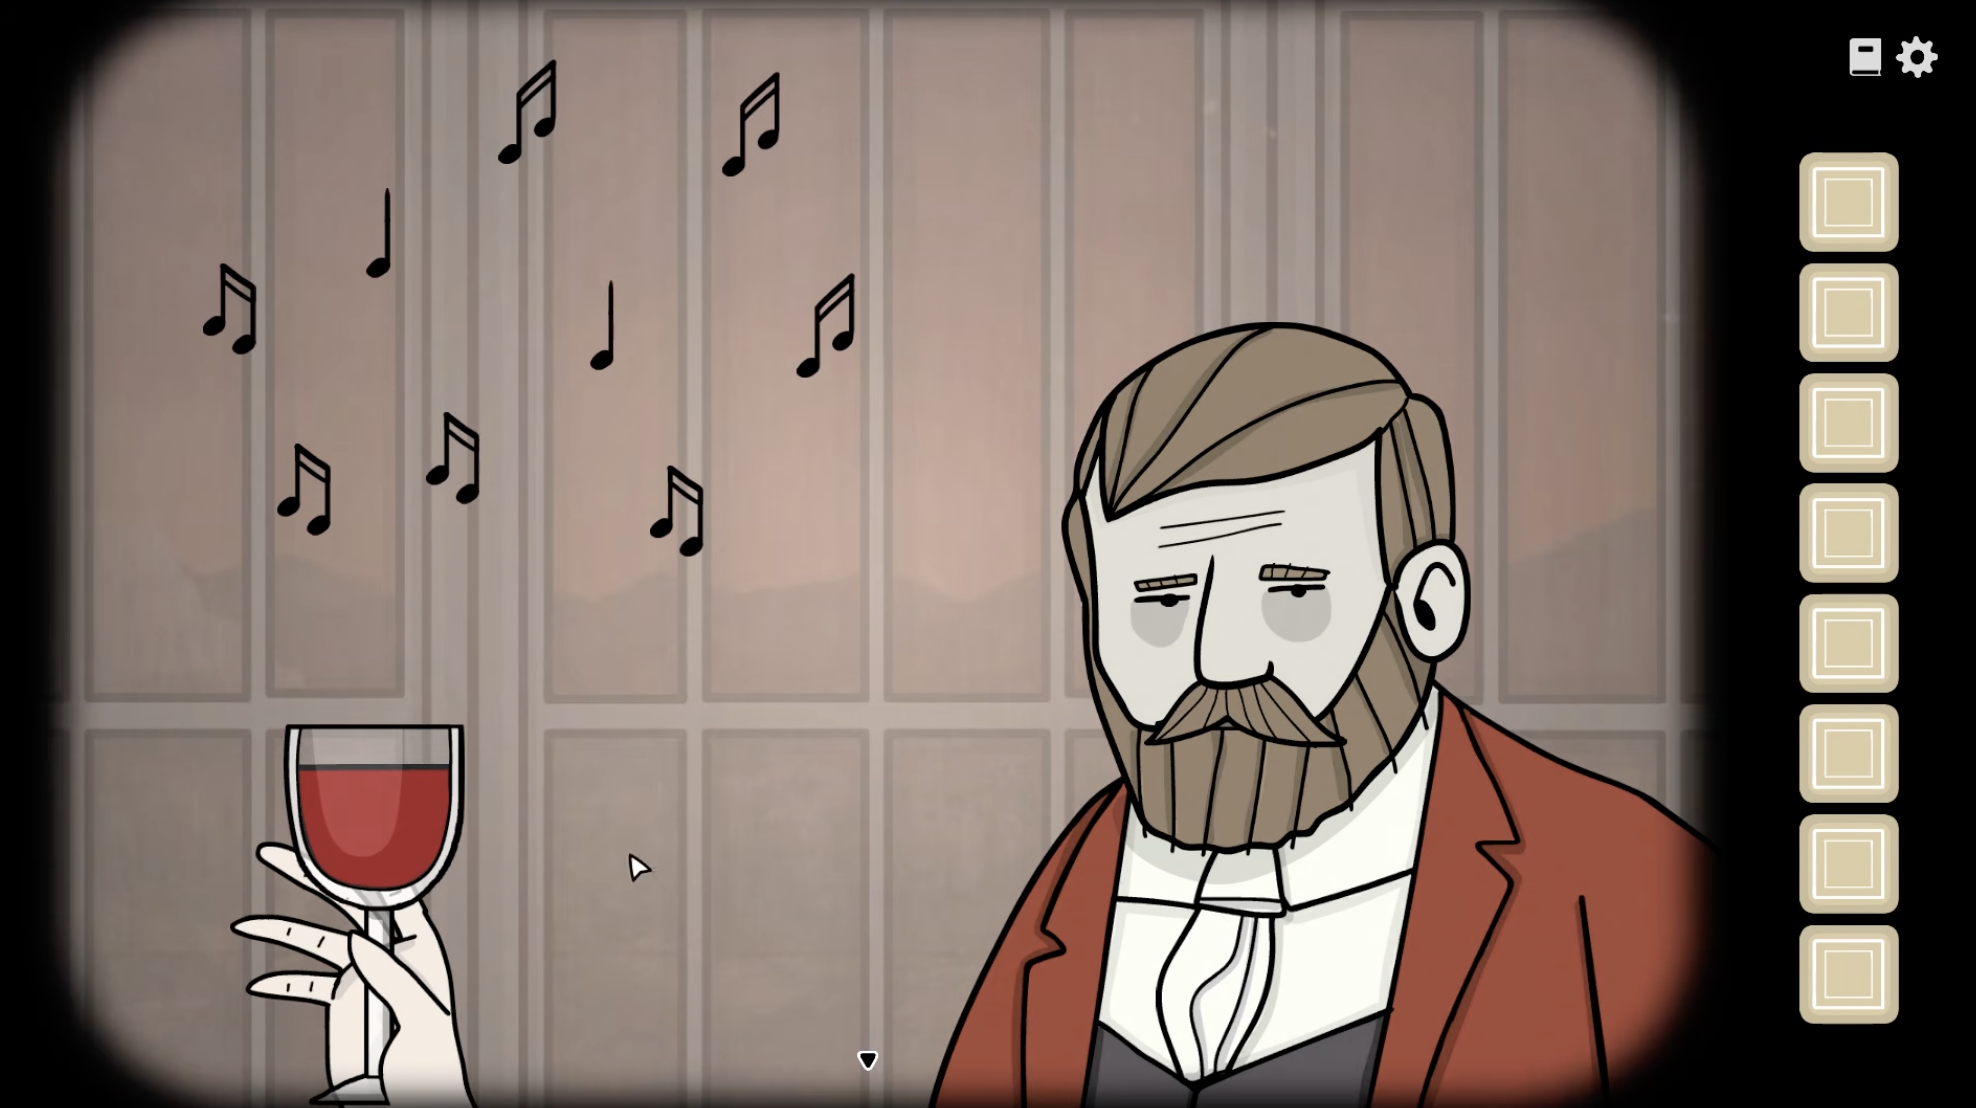
Now it’s time to “enjoy” William’s singing.
To solve this puzzle, make sure all the notes land inside his wine glass; pay close attention to how the notes fall. There is not one solution to this puzzle.
Collect the plate with the main dish from Kate, and once again make sure each sibling gets the correct food.
Solution:
Aldous - potato, broccoli
Alexandra - 2x drumstick, carrot
William - potato, drumstick, carrot, broccoli
Solve the Harp puzzle.
To do this, mirror Alexandra’s movements on the other side of the harp. Play the following (strings counted from left to right):
3x String 1
String 3, String 2, String 1.
String 1, String 5, String 1, String 3.
String 5, String 4, String 3, String 1, String 2
Finally, collect the plate with dessert from Kate and hand the food out one more time.
Solution:
Aldous - 2x cheese
Alexandra - chocolate cake
William - 3x pastry
Interact with Aldous and listen to his speech.
After he draws his gun, pick up the bread knife from the table and use it on the rope holding up the chandelier to make it fall.
This will finish the level.
The Departure
You’re stuck, for now!
Start your escape plan by talking with William.
After he’s done talking, “collect” the broken glass from him and fill it by placing it under the dripping water.
Give the water to Aldous and let him talk.,
Collect the cloth and fork from Aldous and use both on William to obtain the small piece of meat.
Trade the meat with the cat, who’ll give you a hairpin in return.
Use the hairpin on the lock of the door to escape.
To open the lock, point the hairpin at each bolt until they pop off.
Head deeper into the cave and look for some flint.
Use the flint to light a torch so you can keep going.
Make a note of the numbers you see along the way. When your path is blocked, find a plank you can use to bridge a gap.
The numbers you’ll find are: 3, 5, and 8.
At the end of the cave, you’ll need to reopen the doors.
Put the correct times on the timepieces (remember the numbers you found earlier).
Solution from left to right: 3:00, 8:00, 5:00.
Head inside to confront Alexandra.
Collect the baby and walk out of the cave to finish the game.